Home Assistant Setup and Installation Guides
This post may contain affiliate links. As an Amazon Associate we earn from qualifying purchases. Disclosure.
Home Assistant installation takes about 30 minutes on a Raspberry Pi. Here's the right OS to pick, the initial config steps, and the integrations most users add first.
Quick take: Home Assistant is the most capable open-source smart home platform, 3,000+ integrations, no subscription for core automations, all data stays on your hardware. Home Assistant OS is the recommended install method; Container and Core exist for advanced users with specific needs. Remote access options: Nabu Casa ($6.50/month), Tailscale (free VPN add-on), or Cloudflare Tunnel. Pi 4 with a USB SSD (not microSD) or the Home Assistant Green appliance are the standard hardware starting points.
Home Assistant is the most capable open-source smart home platform available. It runs on your own hardware, stores data locally, supports over 3,000 device integrations as of 2025, and imposes no subscription for core automation features. The tradeoff for all of that is a setup process that's more involved than plugging in an Echo or Google Nest Hub. The payoff is a system that does exactly what you configure, nothing more, nothing less, with no vendor deciding what features to deprecate next year.
This section covers hardware selection, installation methods, and the first configuration steps that make the biggest practical difference.
How Do You Choose Hardware for Home Assistant?
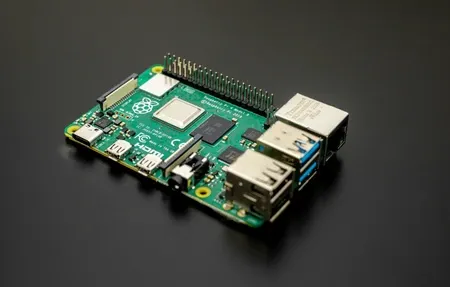
Getting the hardware selection right matters more than it sounds. Home Assistant runs on a surprisingly wide range of hardware, and the choice affects both reliability and long-term expandability.
Raspberry Pi 4 (4GB RAM) is the most common starting point. A Pi 4 with a 32GB or larger microSD card handles a typical home setup, 50-150 devices, basic automations, a dashboard, without strain. One important note: SD card quality matters significantly. Home Assistant writes to storage constantly, and cheap SD cards fail under that sustained workload. Use Samsung Endurance Pro or SanDisk Max Endurance specifically, both are designed for high-write-cycle use cases.
For better long-term reliability, boot from an SSD rather than an SD card. A Raspberry Pi 4 with a USB 3.0 SSD (via a USB-to-SATA adapter) runs more reliably and is faster. An Argon ONE M.2 case is a popular combination that integrates a Pi 4 with an M.2 SSD in a clean enclosure. The Raspberry Pi smart home hub guide covers the full hardware build including OS selection and network storage configuration.
Raspberry Pi 5 is faster than the Pi 4 but less tested with Home Assistant as of early 2026. The Pi Foundation changed the GPIO and power architecture enough that some accessories don't work directly. If you're buying new hardware specifically for Home Assistant, the Pi 4 remains safer. The Pi 5 will likely become the preferred choice as the ecosystem catches up.
Home Assistant Yellow is official hardware from the Home Assistant team (Nabu Casa). It uses a Raspberry Pi Compute Module 4, includes a built-in Zigbee and Thread radio, an M.2 SSD slot, and PoE support. More expensive than DIY but purpose-built and directly supported by the developers who build the software. Zero assembly.
Home Assistant Green is a prebuilt box from Nabu Casa. Plug it in, connect to your network, and it runs Home Assistant OS out of the box. No assembly, no hardware decisions, but it lacks a built-in Zigbee radio (you'll need a USB Zigbee coordinator stick). Good choice for users who want simplicity over expandability.
Intel NUC or repurposed x86 PC becomes relevant if you plan to run Frigate (AI-powered local camera processing) or other resource-intensive add-ons. A used NUC with an i5 processor and 8GB RAM runs everything comfortably. Frigate with hardware-accelerated object detection for 4-6 cameras needs the kind of compute that a Pi struggles with. The smart home cameras overview covers which models work best with Frigate's local object detection pipeline.
What Are the Home Assistant Installation Methods?
Home Assistant offers several installation paths. The official installation documentation at home-assistant.io covers all of them with hardware-specific instructions.
Home Assistant OS is the recommended method. It installs a complete operating system image that includes Home Assistant, the Supervisor (which manages updates and add-ons), and a recovery mechanism. This is what you want if you're dedicated hardware that runs only Home Assistant.
Home Assistant Container runs Home Assistant in Docker, without the Supervisor. You lose add-on management but keep Home Assistant's core automation and device support. Use this if you want to run Home Assistant on a server that already runs other services.
Home Assistant Core is the Python application itself, installed in a virtual environment. Maximum control, minimum support. Recommended only for developers contributing to the project.
For most users: install Home Assistant OS on dedicated hardware. Here's the basic installation flow for a Raspberry Pi:
- Download the Raspberry Pi Imager on your computer
- Select "Other specific-purpose OS" and go to "Home assistants and home automation"
- Select the correct Home Assistant OS image for your Pi model
- Flash to your SD card or SSD
- Boot the Pi, first boot takes 5-10 minutes as it downloads and configures the system
- Access Home Assistant at
http://homeassistant.local:8123from any browser on the same network
The initial setup wizard runs through creating a user account, naming your home, and setting your location. It auto-detects devices on your local network, Philips Hue bridges, Chromecast devices, and other network-visible hardware typically appear in the suggested integrations list immediately.
How Do You Add Zigbee and Z-Wave Support to Home Assistant?
Many of the best smart home sensors use Zigbee rather than Wi-Fi: Aqara motion and temperature sensors, IKEA Tradfri bulbs, Xiaomi door sensors. For these, you need a USB Zigbee coordinator connected to the Pi.
Recommended Zigbee coordinators include:
- Sonoff Zigbee 3.0 USB Dongle Plus, $20, widely compatible, recommended for new setups
- HUSBZB-1, Combines Zigbee and Z-Wave in one USB stick, useful if you want both protocols without two dongles
- Conbee II, Dresden Elektronik's adapter, solid alternative with good firmware support
Plug the USB coordinator into the Pi (use a short USB extension cable to reduce interference from the Pi's own USB 3.0 ports). In Home Assistant, go to Settings > Devices & Services > Add Integration and search for "Zigbee Home Automation" (ZHA). ZHA auto-detects the USB coordinator in most cases and presents a simple interface for adding devices. The Home Assistant integrations hub has device-specific guides for Philips Hue, Shelly, and TONGOU switches that go beyond what ZHA handles automatically.
Z-Wave devices (smart locks, older sensors) work through the Z-Wave JS integration. The setup is similar to ZHA, add a Z-Wave USB stick, install the integration, and devices pair through the Z-Wave inclusion process. Z-Wave runs on a different frequency than Wi-Fi and Zigbee, reducing interference, and offers better mesh network range in larger homes. For Wi-Fi relays that work without a separate hub, the Shelly and Home Assistant setup guide covers local MQTT configuration for cloud-free smart switching.
What First Configuration Steps Actually Matter in Home Assistant?
The order you configure things in Home Assistant matters. Starting with the wrong things wastes time and creates frustration.
These are the highest-impact first steps:
- Set your home location, required for sun-based automations (sunrise/sunset triggers) to work correctly
- Configure backups, add a backup target (network storage, cloud) immediately; Home Assistant generates automatic daily backups but you need somewhere to send them
- Enable SSL, remote access to Home Assistant without SSL is insecure; set up HTTPS through the Nabu Casa subscription ($6.50/month) or a self-managed reverse proxy
- Install HACS, the Home Assistant Community Store adds hundreds of community integrations, themes, and dashboard cards not available in the official add-on store
- Add your integrations, start with 3-5 key services rather than trying to connect everything at once
Don't try to configure everything in the first week. Get lighting, a thermostat, and maybe door sensors working reliably before expanding. Home Assistant's depth is a feature, but the easiest way to get frustrated is to set up 20 things at once and then not understand why something isn't working.
For your first lighting integration, the Philips Hue Home Assistant guide covers both the official bridge path and direct Zigbee pairing once you have a coordinator installed.
How Do You Set Up the Home Assistant Dashboard?
Home Assistant's dashboard (called Lovelace) is fully customizable. The default dashboard auto-generates cards for your connected devices. It's functional but basic.
Custom Dashboard Design
For better usability, create custom dashboards for different users and devices. A tablet mounted in the kitchen showing weather, camera feeds, and quick-access buttons for the lights and thermostat is different from the phone dashboard you use on the go. Home Assistant supports multiple dashboards for different purposes.
The most useful dashboard cards to know early are: entity cards (single device control), glance cards (status overview of multiple entities), and the button card (custom action triggers). Install the custom "button-card" component through HACS for far more flexible button behavior than the built-in version provides.
What Are the Remote Access Options for Home Assistant?
Accessing Home Assistant outside your home network requires either a Nabu Casa cloud subscription or self-configured remote access.
Nabu Casa provides Home Assistant Cloud, a subscription service that creates a secure tunnel to your instance without exposing ports or configuring DNS. It also enables Alexa and Google Assistant integration through their cloud. At $6.50/month or $65/year, it's the lowest-friction option and directly supports the Home Assistant project's development.
Self-managed options include Cloudflare Tunnels (free, no port forwarding needed), a WireGuard VPN to your home network, or a traditional reverse proxy setup. All require more configuration but cost nothing beyond your own time. The Home Assistant remote access guide compares all four options, Nabu Casa, Tailscale, Cloudflare Tunnel, and reverse proxy, with setup complexity and real tradeoffs.
What Should You Expect in the First Month with Home Assistant?
The first month with Home Assistant has a predictable arc. Week one is setup and basic integrations, getting lights, thermostat, and sensors connected and visible. Week two is the first real automations: a morning routine, a sunset trigger for exterior lights, a notification when the garage door is left open.
Week three is usually when something breaks and you learn how troubleshooting works. An integration stops connecting, an automation triggers at the wrong time, or a firmware update changes device behavior. Working through these issues teaches you more about Home Assistant's architecture than any guide does.
By week four, most people are either hooked or have decided it's too much work. If you're hooked, you'll start looking at adding more sensors, exploring blueprints from the community, or customizing your dashboard. The advanced Home Assistant automation guides cover the next layer, conditional logic, presence detection, and template sensors, once your device base is stable. If it's too much, there's no shame in using a simpler platform, not every smart home need requires Home Assistant.
For project ideas once the basics are running, 8 creative Home Assistant community projects shows what experienced users build, useful for understanding where the platform can take you over 6-12 months.
The Home Assistant Getting Started guide is updated regularly with each release and remains the most reliable starting point for new installations. For users moving from Samsung SmartThings, the SmartThings to Home Assistant migration guide covers re-creating your existing automations and reconnecting your devices.
The complete Home Assistant smart home guide ties the full ecosystem together, hardware, integrations, automations, and the sensor foundation that makes advanced automation practical.
Browse the guides below for step-by-step setup instructions and advanced project ideas for Raspberry Pi and Home Assistant.
Frequently Asked Questions
What is the best hardware for running Home Assistant in 2025?
The Home Assistant Green is the official purpose-built hardware at around $100 and handles most home setups reliably. A Raspberry Pi 4 with 4GB RAM runs Home Assistant OS well and is widely documented. For larger setups with many integrations and add-ons, an Intel N100 mini PC (8GB RAM, 128GB SSD) is noticeably faster. Home Assistant also runs in a virtual machine on existing server hardware using Proxmox. The Home Assistant Yellow adds a built-in Zigbee radio and NVMe slot for those who want one unit for everything.
Should I install Home Assistant OS, Supervised, Container, or Core?
Home Assistant OS is recommended for new users, it installs as a dedicated operating system, handles updates automatically, and supports the full add-on ecosystem (Zigbee2MQTT, ESPHome, Mosquitto). Home Assistant Supervised runs on an existing Debian Linux system with the same add-on support but requires manual OS maintenance. Home Assistant Container runs in Docker without add-on support. Home Assistant Core is a Python package for advanced users who need custom environments. Unless you have a specific reason to avoid Home Assistant OS, start there.
How do I access Home Assistant remotely?
Nabu Casa (the company behind Home Assistant) offers a $6.50/month cloud subscription that provides secure remote access without router configuration. Alternatively, set up a WireGuard or Tailscale VPN tunnel to reach your home network directly, Tailscale has a free tier and integrates as a Home Assistant add-on in under 10 minutes. Port-forwarding the Home Assistant port through your router works but is not recommended due to security exposure. Cloudflare Tunnel is another option for secure remote access without opening ports.