Home Assistant: ZigBee, Integrations, and Automations
This post may contain affiliate links. As an Amazon Associate we earn from qualifying purchases. Disclosure.
Home Assistant gives you full local control over every smart device in your home, no cloud subscription required. These guides cover setup, integrations, and automation.
Quick take: Home Assistant is a local smart home server with 3,000+ integrations, no cloud dependency required for most automations. A Raspberry Pi 4 with a USB SSD (not microSD) is the most common hardware setup. The Home Assistant Green is a plug-and-play appliance for quick setup; the Home Assistant Yellow adds a built-in Zigbee coordinator. Guides here cover setup, integrations, automation ideas, and advanced projects for every skill level.
This is the topic hub. Want a first-day walkthrough? Start with getting started with Home Assistant, install, first device, first automation in 20 minutes. Want the complete end-to-end reference with voice assistants, AI automation, and security? Read the complete 2026 Home Assistant guide. The page below indexes our deeper HA guides on ZigBee, integrations, automation patterns, and advanced projects.
Home Assistant is more than a hub. It's a local server that coordinates your entire smart home, logs your energy usage, runs automations, and exposes every device through a dashboard you design yourself. Once you move past initial setup, the depth of what you can build is hard to overstate. This section collects guides for setup, integrations, automation ideas, and advanced projects for every skill level.
How Do You Set Up and Install Home Assistant?
The first 10 things to configure after installation matter more than most guides admit. Backups come first, always. Then user accounts, SSL certificates for remote access, and the Zigbee or Z-Wave coordinator pairing. Skip these steps early and you'll regret it later when something breaks.
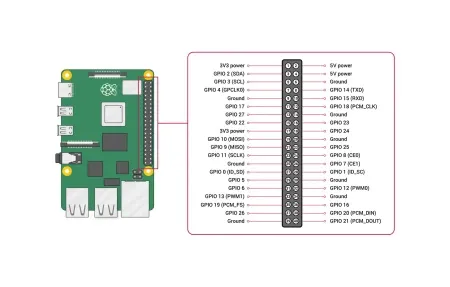
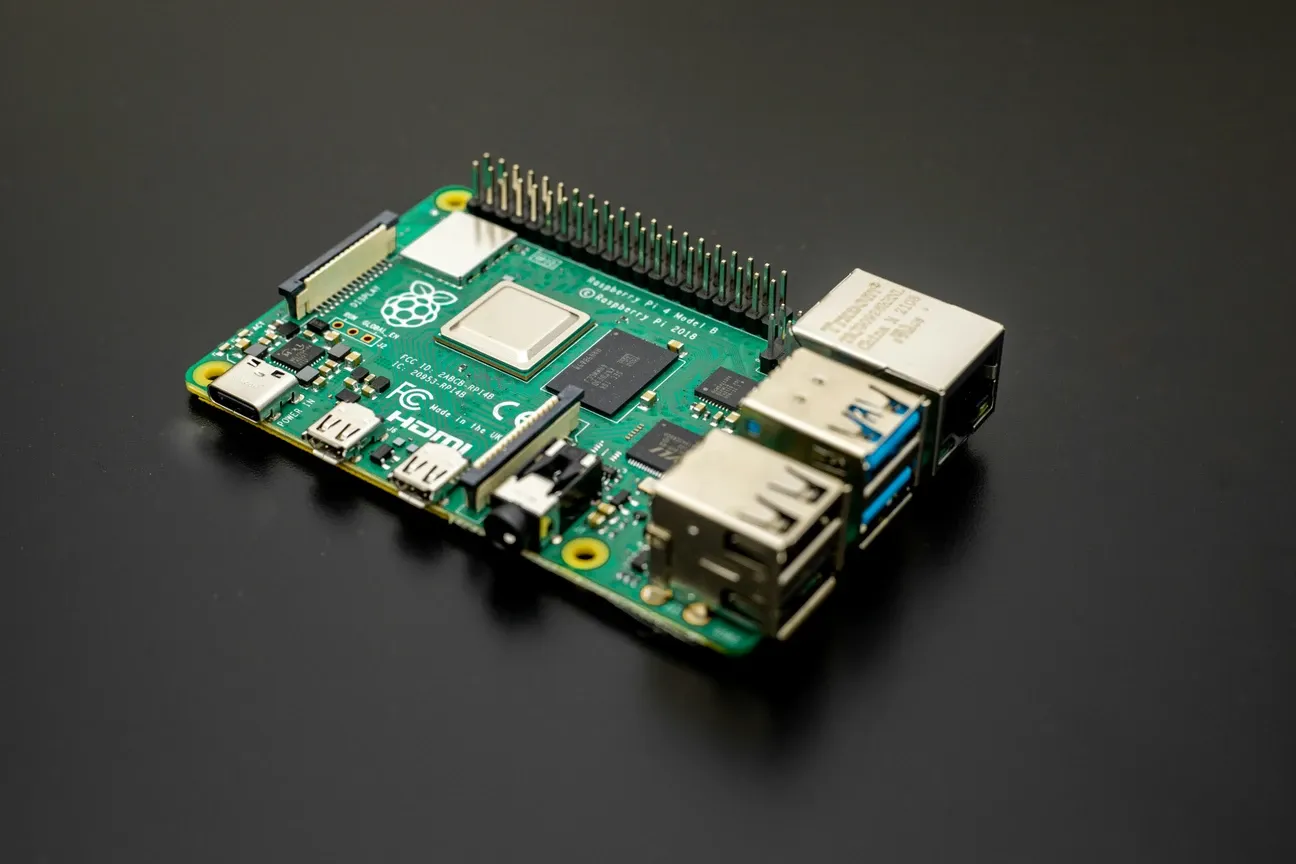
Raspberry Pi builds are popular because the hardware is cheap and well-documented. A Pi 4 running Home Assistant OS with a USB SSD rather than a microSD card performs noticeably better. SD cards wear out under constant database writes. SSDs handle the load without issue. A full setup walkthrough covers hardware preparation, OS flashing, and first-boot configuration, from selecting the right SBC to getting your first automation running.
If Raspberry Pi stock is tight or you'd rather skip hardware assembly, the Home Assistant Green is a plug-and-play appliance that runs the full Home Assistant OS. It costs more, but you're up and running in under 20 minutes. The Home Assistant Yellow adds a built-in Zigbee coordinator and NVMe storage slot, useful if you plan to add Zigbee devices without a separate USB stick. Once you've got the basics running, advanced Raspberry Pi projects open up weather stations, plant monitors, and custom sensor arrays.
What Home Assistant Integrations Are Worth Setting Up Early?
Philips Hue connects to Home Assistant either through the official integration or directly via Zigbee2MQTT if you pair the bulbs directly to a Zigbee stick. The direct Zigbee approach removes the Hue Bridge dependency and gives you faster response times, under 50ms compared to 200ms+ through the cloud bridge. The Philips Hue integration guide covers both the official and direct Zigbee path.
Shelly devices are among the easiest Wi-Fi integrations available. They support local MQTT, which means automations respond without touching the internet. The Shelly Plus 1PM gives you relay control plus real-time energy monitoring in a device that fits behind a standard wall switch. The Shelly and Home Assistant integration guide walks through both the local MQTT setup and the cloud API fallback.
TONGOU smart switches with metering work well in Home Assistant for tracking which circuits use the most power. Combining them with a Home Assistant energy dashboard gives you live consumption data across your home, the kind of detail that reveals whether your old fridge is costing you $15/month more than expected.
The Home Assistant integration catalog covers more than 3,000 services. According to the official Home Assistant documentation, integrations range from major platforms like Google, Amazon, and Apple down to niche sensors and local API devices. This breadth is the platform's biggest advantage over any closed ecosystem. If you're coming from SmartThings, the Home Assistant SmartThings integration guide covers device migration and setting up the official connector.
What Are the Top Home Assistant Automation Ideas for Every Home?
Best Automations to Start With
Home Assistant automation ideas range from practical timesavers to genuinely clever setups, the fully automated home guide walks through a complete real-world build with essential devices and sequences. Here are the ones worth building first:
- Away mode: Turn off all lights, lower the thermostat, and arm cameras when the last person leaves, detected via phone GPS or local network presence
- Adaptive lighting: Adjust color temperature and brightness throughout the day to match your circadian rhythm, from warm yellow in the morning to cool white at midday
- Energy alerts: Notify when a specific circuit exceeds a wattage threshold, useful for catching appliances left on accidentally
- Good morning routine: Gradually increase bedroom light brightness starting 20 minutes before your alarm, making waking up easier in winter
- Moisture detection: Trigger a notification and shut off a connected water valve if a leak sensor detects water under a sink
- Guest mode: Disable presence-based automations when guests are home so they don't trigger "everyone left" sequences
- Dashboard weather integration: Show local forecast data on your main dashboard so you can see rain probability before choosing to open windows
The Raspberry Pi's capabilities extend well beyond basic hub functions. Community GitHub repositories contain blueprints for weather stations with custom sensor arrays, automated plant watering systems, garage door controllers, and irrigation management with soil moisture integration.
What Advanced Home Assistant Projects and Configurations Should You Try?
A fully automated home requires thinking about presence detection carefully. GPS-based detection through the Home Assistant Companion app works reliably for single people, but multi-person households often combine GPS with local network device detection for accuracy. The result: automations that fire when the first person arrives home and others that wait until everyone leaves.
Remote access to Home Assistant deserves attention early. Options include:
- Nabu Casa: The official cloud service from the Home Assistant team. Simple setup, $6.50/month, and your subscription funds Home Assistant development directly
- Tailscale: Free VPN that creates a private network between your phone and your Home Assistant server, with no port forwarding required
- Cloudflare Tunnel: Zero-trust access proxy that exposes your Home Assistant instance without opening your router to the internet
- WireGuard VPN: More setup required, but gives you full control with no third-party dependency
Self-hosted access through Tailscale or WireGuard is what I'd recommend for anyone willing to spend two hours on initial configuration. No monthly fee, fast connection speeds, and no dependency on a cloud service that could change its terms. The Home Assistant remote access guide compares all four options with setup complexity and tradeoffs.
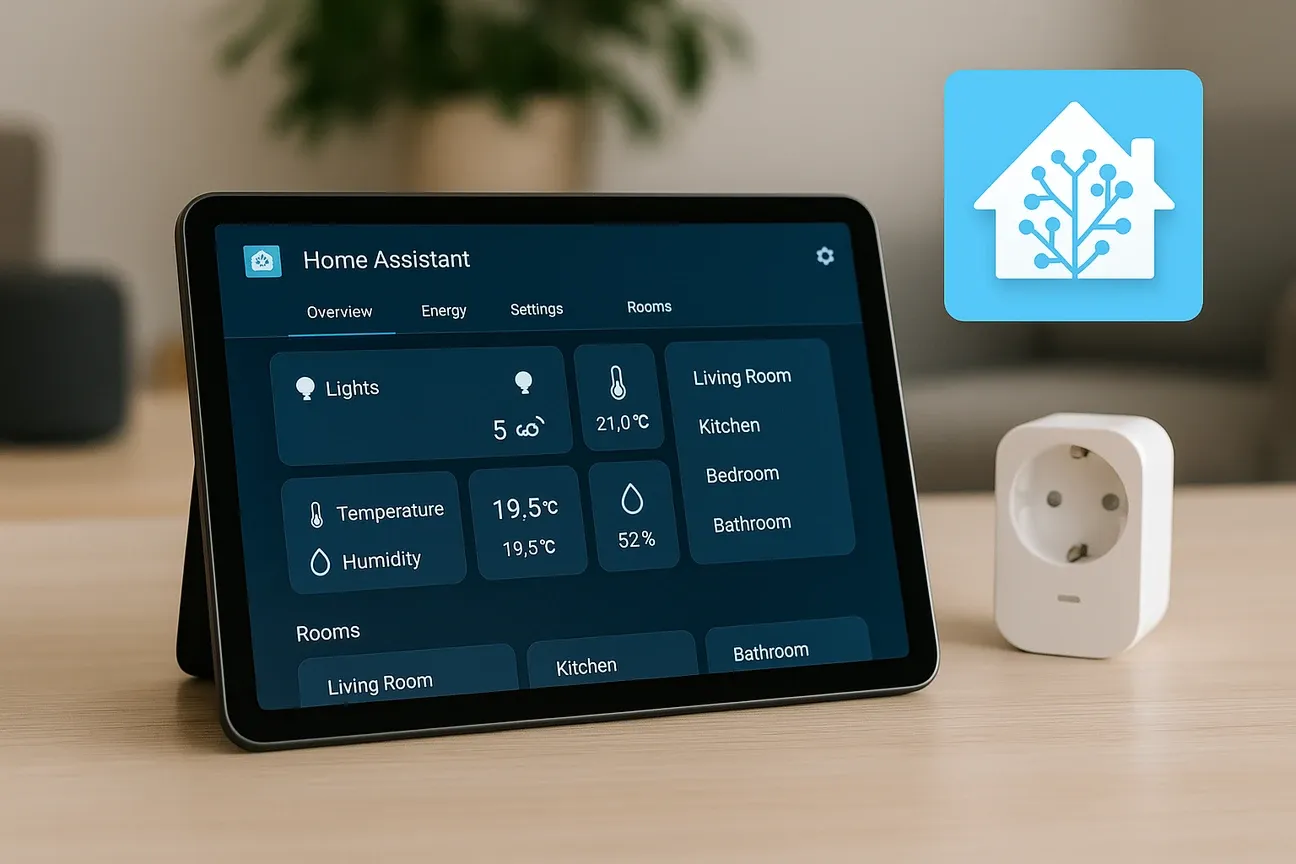
What Home Assistant Dashboards Actually Get Used?
Most Home Assistant dashboards look impressive but get abandoned within a month because they're optimized for demonstration rather than daily use. The ones that stick share a few characteristics:
They load on a wall-mounted tablet in under three seconds. They show the status of devices you actually check every day, not every device you own. They have large tap targets that work with a finger from across the room. And they update in real time without requiring a page refresh.
Lovelace cards that work well for daily-driver dashboards include the Tile card for device status, the Energy distribution card for live power monitoring, and the Calendar card if you have automations tied to schedule.
Why Does the Local-First Approach Win with Home Assistant?
When your internet is down, cloud-dependent smart homes break. Lights won't respond. Automations skip. Dashboards show errors. A locally-run Home Assistant installation keeps everything working regardless of your ISP's reliability. That's not a small thing, internet outages affect most households at least a few times a year.
The other argument for local processing is latency. Cloud automations typically take 500ms to 2 seconds to execute. Local automations in Home Assistant run in under 100ms. When you tap a light switch on your phone, the difference between instant and slightly delayed matters more than you'd expect before experiencing it.
The guides in this section cover every major configuration step, from basic Raspberry Pi setup through advanced automation scripting. Start with the installation guide, then work through the integration-specific guides for the devices you already own. If you want local voice control without cloud dependencies, my journey Alexa local voice assistant covers the full setup and what to expect.
How Are Zigbee and Z-Wave the Backbone of Local Smart Home Networks?
Wi-Fi devices are the easiest entry point, but Zigbee and Z-Wave are what make a serious Home Assistant setup reliable. Here's why.
Wi-Fi devices eat your router bandwidth and depend on cloud APIs. When Tuya or Smartlife has a service outage, your Wi-Fi smart plugs stop responding. Zigbee and Z-Wave devices communicate directly with the coordinator USB stick on your Home Assistant server, with no cloud dependency after pairing.
Zigbee builds a mesh network automatically. Each mains-powered Zigbee device (plug, bulb, switch) extends the range for battery-powered devices nearby. A Zigbee door sensor on the far side of your home works reliably when there's a mains-powered bulb halfway between it and the coordinator. Getting the mesh right takes some device placement thought, but once it's working, it's rock solid.
The most popular Zigbee coordinator for Home Assistant is the SONOFF Zigbee 3.0 USB Dongle Plus at around $20. Combined with Zigbee2MQTT, it supports over 3,000 Zigbee devices from Aqara, IKEA, Philips Hue, Sonoff, and dozens of other manufacturers. That's the combination I'd recommend for anyone starting fresh.
Z-Wave is the better choice for locks and security devices. The Z-Wave protocol uses a different frequency from Wi-Fi and Zigbee, which eliminates interference. Z-Wave S2 security framework uses strong encryption, making it the preferred protocol for anything on an exterior door. The Z-Wave JS integration in Home Assistant handles this well.
How Do You Set Up Home Assistant Energy Monitoring?
The Energy dashboard is one of Home Assistant's most underused features. Connect your home's energy data sources and you get a live view of what's consuming power, hour by hour.
Sources you can connect to the Energy dashboard include:
- Smart meters with local API access (P1 port in EU, some US smart meters)
- Shelly 3EM or TONGOU metering devices measuring individual circuits
- Solar inverter integrations for generation tracking
- EV charger integrations for charging session monitoring
With all sources connected, the dashboard shows total consumption, renewable generation, grid import, and battery storage state in one view. You can drill down to individual device consumption if those devices report wattage through Home Assistant integrations.
The practical value shows up on your electricity bill review. After two months of Energy dashboard data, I identified an old chest freezer in the garage pulling 200W constantly, costing about $22/month in electricity. Replacing it with a modern unit recovered the purchase cost in 14 months. That's a real-world return that no other smart home platform helped me find.
When Should You Use Automations vs Scripts vs Scenes in Home Assistant?
New Home Assistant users often confuse these three tools. They serve different purposes.
Automations trigger automatically based on conditions: time, sensor state, device status, or location. They run without you doing anything. "Turn off all lights at 11 PM" is an automation.
Scripts are sequences of actions you run manually or call from automations. They're reusable building blocks. "Set evening mode" might be a script called by multiple automations.
Scenes capture the current state of multiple devices and let you restore that state later. Useful for lighting configurations: "Dinner scene" might set the dining room lights to 40%, warm white, and the kitchen undercabinets to 60%.
Using all three deliberately makes your Home Assistant config much easier to maintain. Long automations with dozens of actions are hard to debug. Breaking them into short automations that call scripts keeps things readable and reusable.
Frequently Asked Questions
Does Home Assistant require an internet connection to work?
No. Home Assistant runs entirely on your local network and controls compatible devices without any cloud dependency. Automations, scenes, and device control all work during internet outages, the hub processes everything internally, so there's no cloud round-trip adding latency. During a 4-hour ISP outage last winter, every automation in my house kept running: lights followed their schedules, the heating adjusted by time of day, and door sensors triggered the entry light exactly as they would on a normal day. Cloud features, remote access via Nabu Casa ($6.50/month), Google Assistant or Alexa integration, and some third-party cloud-based integrations, require internet connectivity. But the core platform stays functional either way. This local-first architecture is the primary reason users choose Home Assistant over cloud-dependent platforms; when Amazon or Google has an outage, their smart homes stop working. Home Assistant installations typically keep running.
What hardware do I need to run Home Assistant?
A Raspberry Pi 4 with 4GB RAM and a 32GB microSD card handles most home setups reliably, 2GB minimum works but leaves less headroom for add-ons. The Home Assistant Green ($99) is a better starting point for most people: it's a dedicated plug-and-play device with better SD card endurance than a Pi running 24/7. Home Assistant Yellow ($155) adds a built-in Zigbee and Thread radio plus an NVMe slot, which removes the need for a USB Zigbee dongle. For larger setups with 300+ devices, an Intel NUC or mini PC running Home Assistant in a virtual machine or Docker container handles the load better. I started on a Pi 3B+ and it handled 40 devices for two years before I moved to the Green; the main Pi risk is SD card wear from constant writes. The Home Assistant OS installation is recommended over Docker for beginners because it handles updates and add-ons automatically.
How many devices can Home Assistant control?
Home Assistant has no practical device limit for most homes. Large installations run 500 to 1,000+ devices without performance issues on modern hardware like the Home Assistant Green or a Pi 4. The limiting factor is usually the radio protocol mesh, not the hub itself. Zigbee networks typically support 50 to 100 devices per coordinator before routing becomes unreliable, adding a second USB Zigbee coordinator on a different USB bus extends this significantly. Z-Wave supports up to 232 nodes per network, and every powered Z-Wave device acts as a repeater, so the mesh strengthens as you add devices. Wi-Fi devices are limited only by router capacity. I've been running 180 devices on a single Pi 4, roughly 120 Zigbee and 60 Wi-Fi, and the Home Assistant dashboard loads in under 2 seconds and automations fire in under 200 milliseconds. The bottleneck for most users is network planning, not the hub.