How to Install Home Assistant OS on a Raspberry Pi 2026
This post may contain affiliate links. As an Amazon Associate we earn from qualifying purchases. Disclosure.
Install Home Assistant OS on your Raspberry Pi and turn it into a powerful smart home hub with local control and zero subscription fees.
This step-by-step guide shows you how to install Home Assistant on a Raspberry Pi. It's a proven way to build a smart home hub with full local control. The setup takes about 30 minutes. You'll have a single dashboard managing all your IoT devices.
Bottom line: One-third of all Home Assistant users run on Raspberry Pi (Home Assistant Blog, 2024). Flash Home Assistant OS to a microSD card using Pi Imager, insert it into your Pi 4 or Pi 5, plug in power and Ethernet, then open
homeassistant.local:8123in a browser. The whole process takes under 30 minutes.
You will:
- Set up the OS on your SD card
- Put the hardware together
- Get your hub running and online
With a Pi 4 or 5 and a few basic tools, you can build a hub that manages all your IoT devices from one screen.
Why Is Home Assistant OS the Best Choice for Raspberry Pi?
Home Assistant reached 2 million active installations in April 2025, and the platform deprecated both Core (2.5% of users) and Supervised (3.3%) methods that same year (Home Assistant Blog, 2025). That leaves Home Assistant OS as the recommended path for nearly all users.
HAOS is a tiny, fast operating system built specifically for the Pi and similar boards. It runs lean and stays out of your way. The Supervisor handles updates, add-ons, and backups on its own. You don't need to manage any of that yourself. This method gives you the best combination of stability, community support, and easy maintenance.
What Are the Key Components?
Home Assistant's architecture splits into four layers that work together across 2 million active installations (Home Assistant, 2025). Before you start, it helps to know what each piece does:
- Home Assistant OS: The small operating system that runs on your Pi
- Core: The smart control software inside the OS
- Supervisor: Handles updates, add-ons, and system tasks automatically
- Ecosystem: All the integrations, add-ons, and community tools
This guide uses the OS method. It's the easiest way to get started on a Pi.
What Do You Need Before Starting?
Over 68 million Raspberry Pi boards have been sold since 2012 (Raspberry Pi Ltd, 2024), and the Pi 4 and Pi 5 are the recommended models for Home Assistant. Make sure you have these items before you begin:
- A Raspberry Pi 4 or Raspberry Pi 5
- A microSD card with at least 32 GB storage
- A good power supply for your board
- An SD card reader to flash the OS
- An ethernet cable, or a Wi-Fi network ready to use
- A computer to download and flash the OS
Why A2 SD Cards Matter
A2 microSD cards are built for fast, small file tasks. That's exactly what Home Assistant does all day. An A2 card keeps writes fast and boot times short. It also lasts much longer than a standard card. Pick a card with at least 2 GB of RAM on the board too.
Want even better reliability? Backblaze data shows SSDs have a lifetime annual failure rate of just 0.90% (Backblaze, 2023). A USB-to-SSD adapter with the Pi gives you 3-5x faster I/O and far longer lifespan than any SD card.
How Do You Prepare Your SD Card with the Home Assistant OS?
-
Download the official Pi Imager tool from the Raspberry Pi website.
-
Open the Imager app.
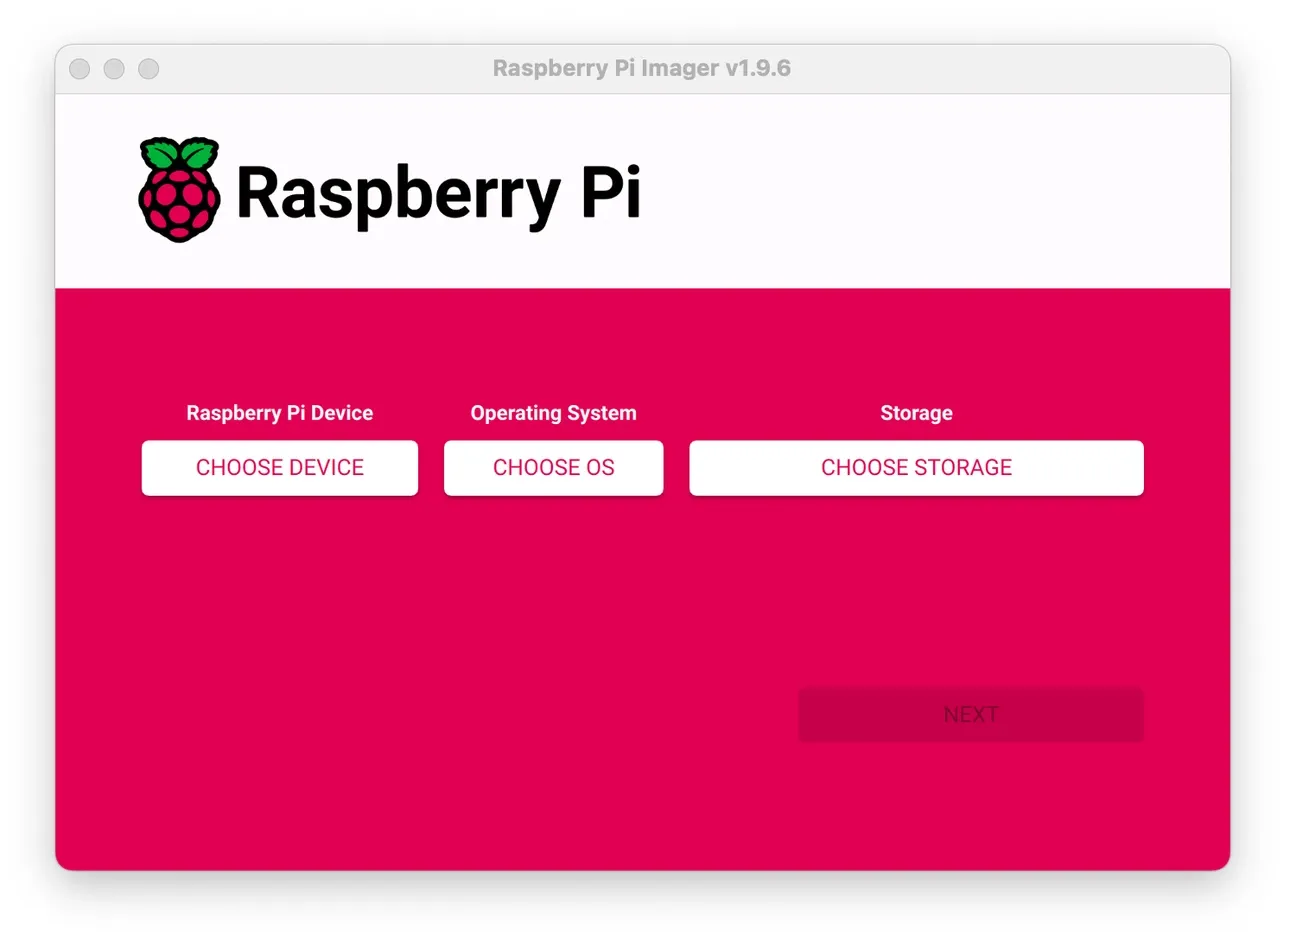
- Pick your device.
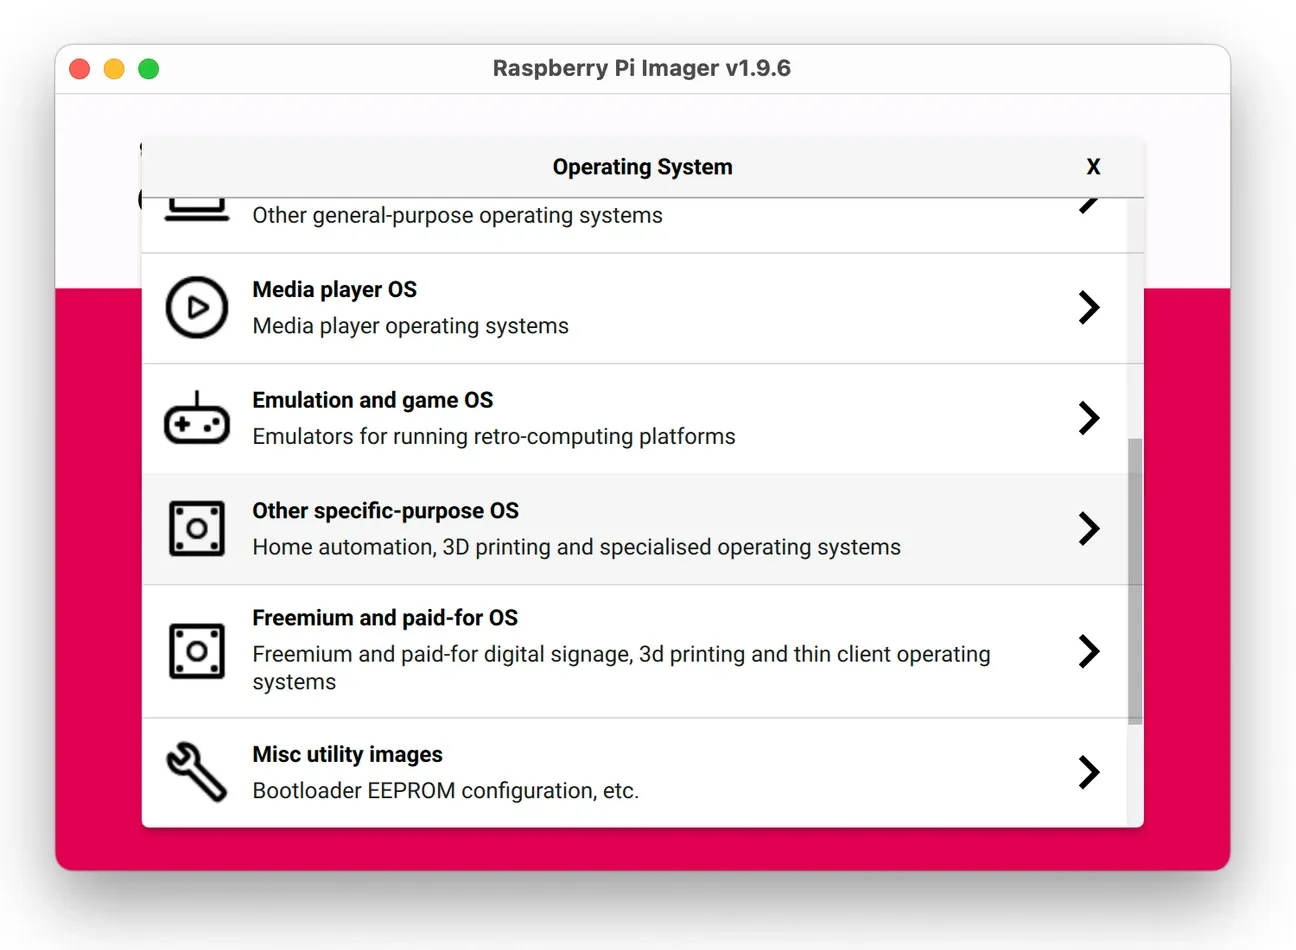
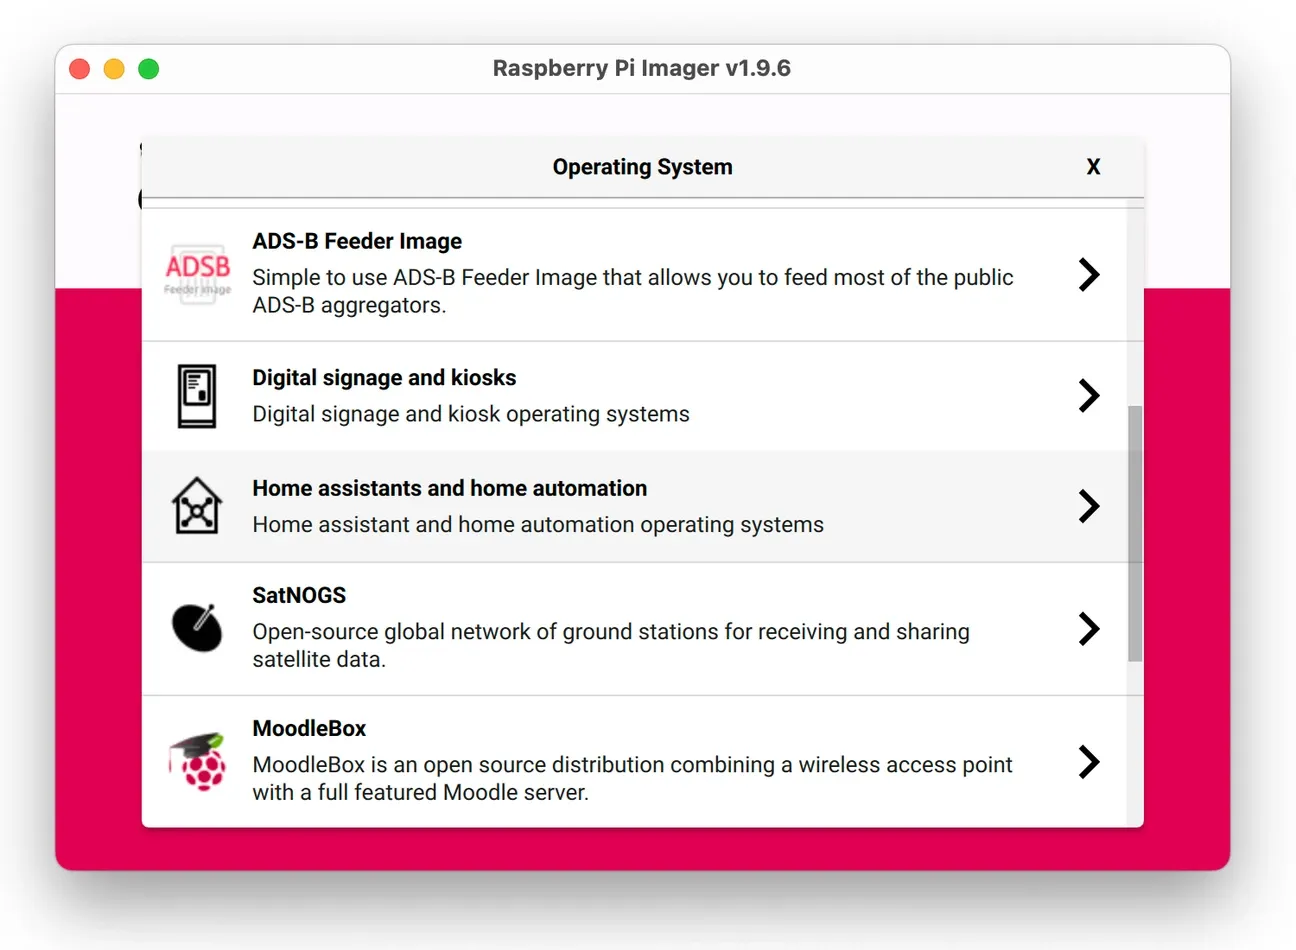
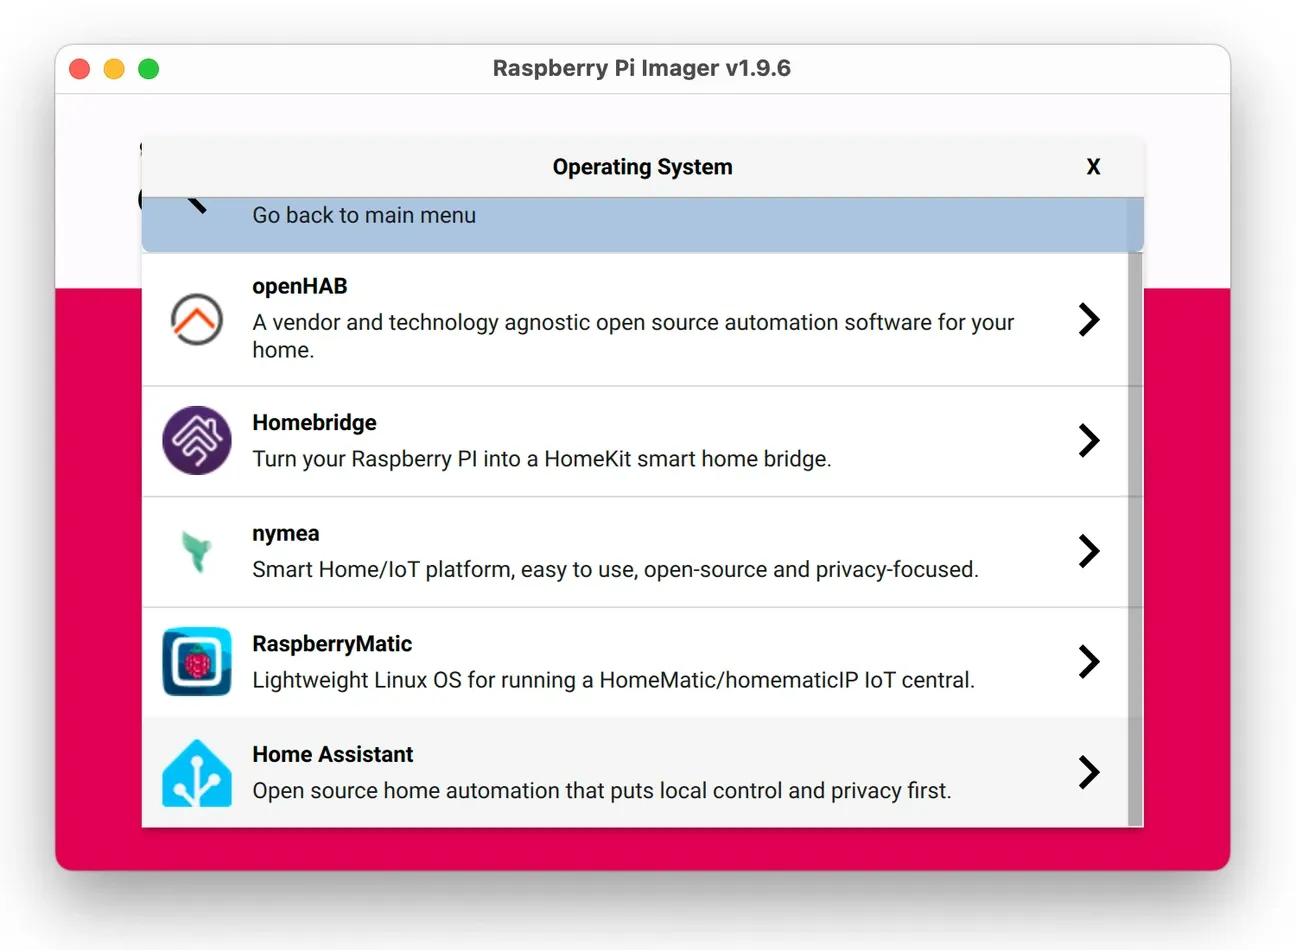
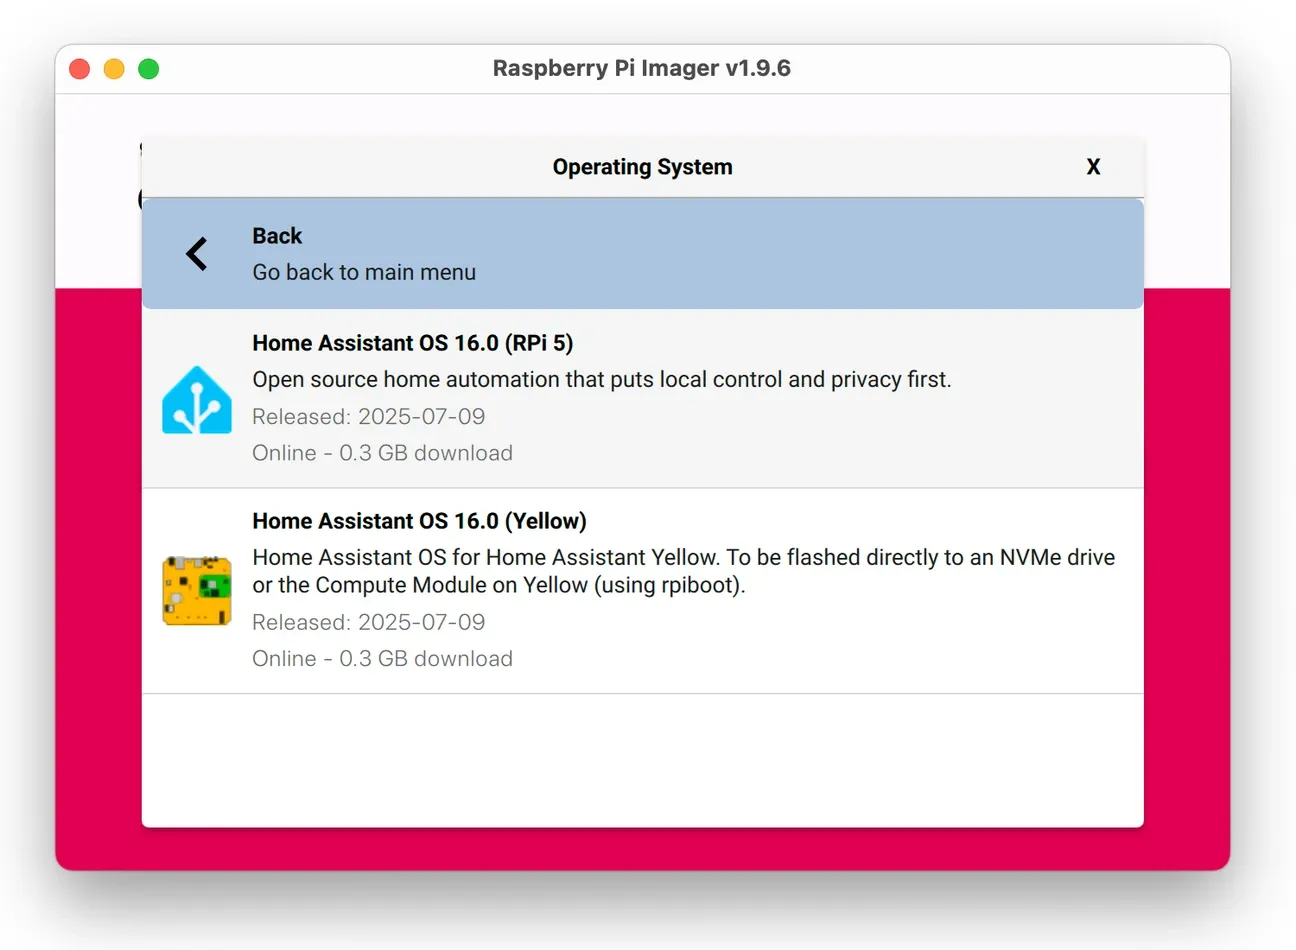
- Go to Choose OS, then Other specific-purpose OS, then Home assistants and home automation. Pick the version that matches your Pi model.
-
Insert your microSD card into the reader. Then pick it under Choose Storage.
-
Click Next to write the OS to the card. This erases all data on it. Back up anything important first.
-
When done, eject the card safely.
How Do You Flash Home Assistant Using Balena Etcher?
If you'd rather flash manually, use Balena Etcher. It's a clean, simple tool.
Direct Image Download
Find all images at Home Assistant OS GitHub releases.
Download the HAOS image that matches your Pi model. For Pi 5 it looks like:
- Image:
haos_rpi5-64-XX.X.img.xz(replace XX.X with the latest version number) - Checksum:
haos_rpi5-64-XX.X.img.xz.sha256
Tip: Balena Etcher can flash compressed
.img.xzfiles directly - no need to unpack.
What You'll Need
- A microSD card (16 GB min; 32 GB+ is better, A2/U3 if you can)
- A card reader
- Balena Etcher (Windows, macOS, or Linux)
- Pi board, official power supply, and ethernet for first boot
Flash with Balena Etcher
- Save the
.img.xzfile to your computer. - Check the file hash if you want to be sure it's not corrupt:
- Windows (PowerShell):
Get-FileHash .\haos_rpi5-64-XX.X.img.xz -Algorithm SHA256 - macOS:
shasum -a 256 haos_rpi5-64-XX.X.img.xz - Linux:
sha256sum haos_rpi5-64-XX.X.img.xz
.sha256file contents. They must match exactly. - Windows (PowerShell):
- Install and open Balena Etcher.
- Click Flash from file and pick the
.img.xzfile. - Click Select target and pick your microSD card. Double-check the drive letter.
- Click Flash. Wait for it to finish and verify.
- Enter your password if prompted.
- Eject the card safely.
How Do You Assemble and Boot Your Pi?
Now it's time to put things together:
- Insert the flashed microSD card into your Pi.
- Plug in the ethernet cable. Connect it to your router. This gives a stable first-boot connection.
- Add a Zigbee dongle via USB if you plan to use non-Wi-Fi devices. Use a short USB extension cable to avoid signal issues.
- Plug in the power supply. The Pi will boot into Home Assistant OS.
You don't need a monitor or keyboard. The Pi runs headlessly. The first boot can take a few minutes, so be patient.
How Do You Access Your New Home Assistant Hub?
- Open a browser on your computer or phone. It must be on the same network as the Pi.
- Go to
http://homeassistant.local:8123or use your Pi's IP address with:8123. - The first boot can take up to 20 minutes. It's setting everything up. Wait it out.
- After setup, you'll create a user account. Save your login details somewhere safe. You can't recover them if lost.
How Do You Fix Common Setup Issues?
If something goes wrong, try these fixes:
- Re-flash the SD card with the right OS image for your Pi model.
- Check your network. Wired ethernet works best for the first boot.
- Make sure your power supply is strong enough. Low power causes boot failures.
- Visit the Home Assistant community forums for help with your specific device.
How Do You Keep HAOS Updated?
Home Assistant shipped 12 major releases in 2024, each adding new integrations and security patches (Home Assistant Blog, 2024). Updates come frequently. When a new version ships, you will see a notification in the Settings panel. Before upgrading, check the release notes at the Home Assistant blog for any known issues with your Pi model.
The safest upgrade approach is this:
- Create a backup before every major update.
- Wait 2-3 days after a major release to let early bug reports come in.
- If an update causes issues, use Settings > System > Backups to restore your last working state.
The Supervisor handles all update mechanics. You do not need to re-flash your SD card for updates. Stay on the latest release for security patches and new integrations.
What Should You Do After Setup?
Once your hub is running, here's the path that works best. Start simple and build up.
First Time Steps:
- Create a user account with a strong password
- Set your home location for weather and sun-based automations
- Pick your unit system (metric or imperial)
- Set up your Wi-Fi if you prefer wireless
Use a quality A2 microSD card and back up your settings often. Add a case with a heat sink to keep your Pi cool during long use. Try simple automations based on time, presence, or sensor data.
Next Steps: Open the add-on store under Settings > Add-ons to install ESPHome, SSH, or Z-Wave support. Connect your first smart devices. Start with Wi-Fi devices for the easiest experience. Advanced users can edit configuration.yaml directly for fine-grained control over integrations and sensors. Build a few simple automations using the built-in editor. Try community blueprints and pre-made scripts. Set up alerts on your phone.
Hardware Add-Ons: If you use non-Wi-Fi devices, consider a Zigbee dongle for Philips, IKEA, and similar devices. Add a Z-Wave stick for older smart home devices. Pick up a Thread/Matter USB stick for newer smart home standards.
What Can You Build With Your Hub?
Here's what you can actually do with your hub once it's running:
Lights: Turn on hall lights at 80% when motion is detected at night. Turn them off 5 minutes after motion stops. Skip daytime hours in summer to save energy.
Climate: Warm your home one hour before you wake up. Lower the heat when everyone leaves. Create a guest mode that adjusts the temp and locks the doors.
Energy: Track which devices use the most power. Turn them off after a set idle time. Avoid running big appliances during peak rate hours.
Security: Arm your system when everyone leaves. Randomly turn lights on and off to look like someone's home. Get phone alerts when a door or window opens. Use reliable sensors to keep an eye on every entry point.
Morning Routine: Build a "Good Morning" scene. Gradually brighten your bedroom lights. Start the coffee. Show the weather on your dashboard.
Why Does Home Assistant Beat Other Hubs?
Most smart home hubs lock you into one brand. Amazon Alexa needs Amazon. Google Home needs Google. Home Assistant works with nearly any device from any brand. If you want remote access without opening ports, Nabu Casa's $6.50/month subscription adds encrypted cloud connectivity and voice assistant support. With over 3,400 integrations available and 2 million active installations (Home Assistant, 2025), the platform keeps growing. You get:
- No vendor lock-in
- No subscription fees for local control
- Your data stays on your own network
- Full customization for advanced users
- Long-term support even if a brand stops making products
The Pi is a solid hub platform. It's cheap, uses little power, and runs 24/7 without big electricity bills. The community is huge. You'll find help for almost any problem.
How Do the Raspberry Pi Models Compare for Home Assistant?
The Raspberry Pi 5 uses an Arm Cortex-A76 processor clocked at 2.4 GHz, delivering 2-3x the performance of the Pi 4's Cortex-A72 (Raspberry Pi Ltd, 2023). Here's how the three main models compare for Home Assistant:
Feature          | Pi 4 (4GB)  | Pi 5 (4GB)  | Pi Zero 2W
Processor Speed  | 1.5 GHz     | 2.4 GHz     | 1.0 GHz
RAM              | 4GB         | 4GB         | 512MB
Device Limit     | 200-300     | 300-500+    | 10-30
Add-ons Limit    | 3-5         | 5-8         | 1-2
Price            | $55         | $80         | $15
Recommended      | Small home  | Large home  | Testing
The Raspberry Pi 5 boots nearly twice as fast as the Pi 4 for Home Assistant workloads (Peyanski, 2024). The newer D0 stepping also cuts idle power by 30% (Jeff Geerling, 2024). The Pi 4 handles small to medium homes well. The Pi 5 is better for big setups with 300+ devices. The Zero 2W is fine for testing but not for daily use.
Start with the Pi 4 (4GB) if your budget is tight. Move to the Pi 5 if you plan to grow your setup. An SSD upgrade adds $30 to $50 but makes the Pi 3 to 5 times faster.
How Do You Secure and Back Up Your Hub?
Security research consistently finds that a majority of IoT devices in homes run with default or weak credentials, making them easy targets for unauthorized access. Use a fixed IP address for your Pi. Set it in your router's settings. This stops homeassistant.local from failing to resolve. Use a strong password on your account right away. Enable two-factor authentication in Settings. Keep your system updated - new versions fix security issues. Use HTTPS with a Let's Encrypt cert for safe remote access. A VPN is safer than opening a port to the internet.
Set up auto backups in Settings. Keep the last 7 days saved. Store a copy on a USB drive or in the cloud. Test restoring from backup every month.
If your Pi fails, here's how to recover:
- Flash a new SD card with the latest Home Assistant OS.
- Don't create an account yet. Go straight to Settings and restore from backup.
- Everything comes back: your devices, automations, and settings.
What Are the Home Assistant Install Options?
- Home Assistant OS (this guide): Best for beginners. Easy updates and add-ons. Takes 30 to 45 minutes.
- Container: Good for Docker users. Needs more manual work.
- Core: For developers who know Python. Most control, steepest learning curve. Being deprecated in 2025.
- Virtual Machine: Great for testing before buying a Pi.
Your Pi is now ready to become a powerful smart home hub. Start simple. Build up over time. The platform grows with you.
For the full Home Assistant installation documentation, check the official site. Once your hub is running, continue with the first 10 things to configure in Home Assistant to set up your smart home properly.
Frequently Asked Questions
Should I pick the Raspberry Pi 4 or Pi 5 for Home Assistant?
The Pi 4 (4GB, $55.00) handles up to 200 to 300 devices and 3 to 5 add-ons for most homes without issues. The Pi 5 (8GB, $80.00) boots nearly twice as fast, handles 300 to 500+ devices, and draws 30% less idle power with the newer D0 chip. I've run both and the difference isn't noticeable for a basic 50-device setup, but once you add Frigate for camera processing or Matter Server for Thread network management, the Pi 5 stops feeling optional. Pick the Pi 4 if you're on a tight budget and starting fresh, it'll handle a typical home for years. Pick the Pi 5 if you're running Frigate with more than two cameras, plan to run a lot of add-ons, or manage more than 150 devices. A Pi 5 with a 500GB SSD costs about $110 total and will outlast the Pi 4 for write-intensive workloads like database-heavy history recording and long-term sensor logging.
Can I use an SSD instead of a microSD card?
Yes, and it's one of the best upgrades you can make. SSDs have a lifetime annual failure rate of just 0.90% compared to microSD cards that degrade faster under constant writes. Use a USB 3.0 to SATA adapter with any 2.5-inch SSD. After flashing, boot from USB in the Pi's boot config. I switched to a Samsung 870 EVO 250GB SSD ($39.99) with a StarTech USB312SAT3CB adapter ($17.99) on my Pi 4 and boot time dropped from 62 seconds to 28 seconds. The bigger win was the Home Assistant database, history queries that took 8-12 seconds now run in under 2 seconds. MicroSD cards rated for 40 MB/s sequential writes handle random 4K writes at only 1-3 MB/s, which degrades database performance within 6-18 months. If you're on a Pi 5, the Argon ONE V3 case ($49.99) includes an M.2 NVMe slot, that's the fastest option and worth it for setups running Frigate or Matter Server.
How long does the full installation take?
Flashing the SD card takes 5-10 minutes. First boot and initial setup take another 15-20 minutes. The entire process from download to working dashboard runs about 30 minutes. Most of that time is waiting for the first boot to finish. I've timed this across six installs on different hardware. Download speed is the main variable, the Home Assistant OS image is about 1.1 GB. On a 500 Mbps connection it downloads in under 2 minutes; on 50 Mbps, add 10 minutes. Raspberry Pi Imager handles verification and flashing after that. The first boot converts the image and initializes the SQLite database, that step runs about 18 minutes on a Pi 4 with a microSD card. With an SSD on the same Pi 4, I measured 11 minutes. On a Pi 5 with an SSD, first boot finished in 8 minutes. After the welcome screen loads at homeassistant.local:8123, allow another 5 minutes for onboarding before automations work.
Can I migrate Home Assistant from one Pi to another?
Yes. Create a full backup in Settings > System > Backups. Flash the new Pi with Home Assistant OS. On first boot, skip account creation and restore from your backup file. All devices, automations, dashboards, and settings transfer. The process takes about 10 minutes. I migrated from a Pi 4 to a Pi 5 last year, the backup file was 1.2 GB after two years of use, so download it locally first, don't trust cloud backup alone. One thing doesn't transfer cleanly: custom integrations installed via HACS. The config files move over but HACS doesn't reinstall the integration packages themselves, so check Settings > Add-ons after restore and reinstall anything that shows as broken. For the full Home Assistant installation documentation, check the official site. Once your hub is running, continue with the first 10 things to configure in Home Assistant to set up your smart home properly.