Home Assistant Set Up: First Time Step-by-Step Guide
This post may contain affiliate links. As an Amazon Associate we earn from qualifying purchases. Disclosure.
Install Home Assistant OS, connect your first Zigbee device, and set up a basic automation in under an hour. This step-by-step guide covers everything for a first-time setup.
Your first Home Assistant set up can feel like a lot at first. But it doesn't have to be. This step-by-step guide walks you through every part of the process. By the end, your smart home will be up and running smoothly.
Bottom line: Install Home Assistant on a Raspberry Pi or mini PC, open homeassistant.local:8123 in a browser, create an account, and let auto-discovery find your devices. The whole process takes about an hour, costs nothing beyond hardware, and gives you local control with no subscriptions required.
How Do You Begin Your Home Assistant Setup?
The first thing you need to do is install the system. You can use a Raspberry Pi, a mini PC, or a home server. Once it's running, open a browser on your phone or computer. Type in the device's IP address and add :8123 at the end. For example: http://192.168.x.x:8123.
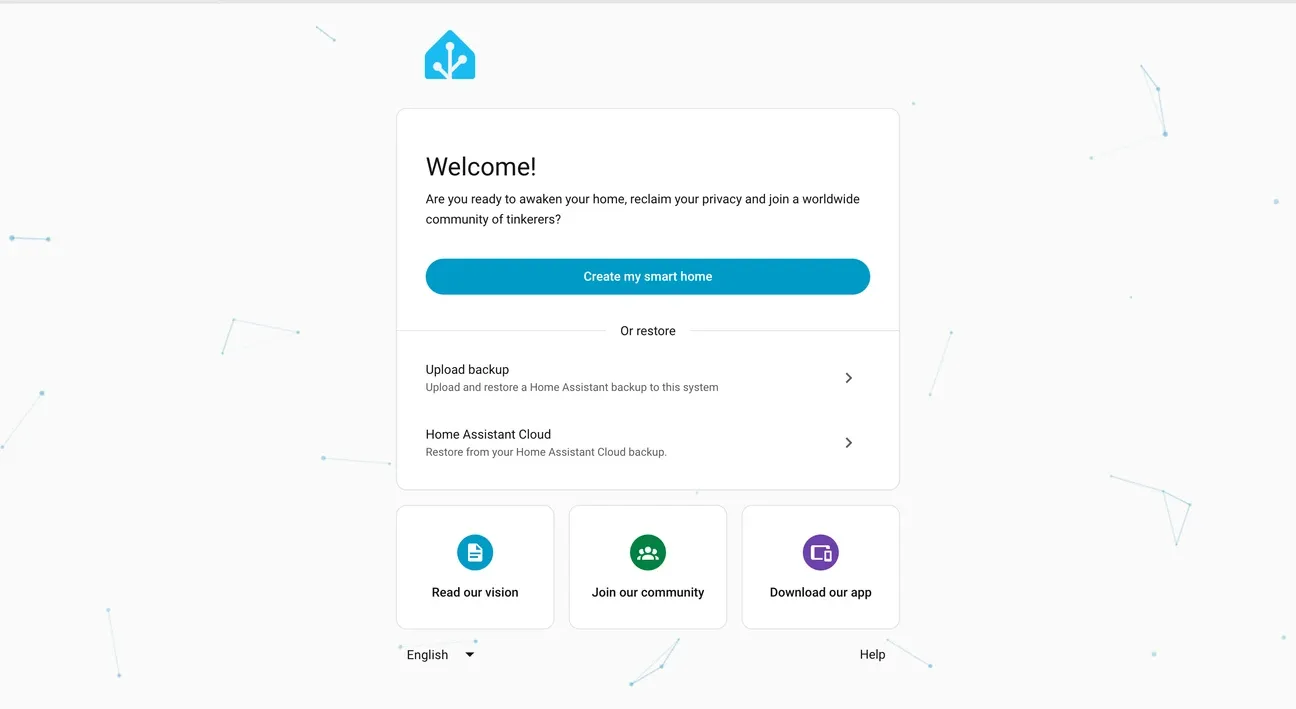
The standards body publishes the details at Home Assistant official documentation. You'll see the Home Assistant login page. A setup wizard will guide you from there.
You may see a "Preparing Home Assistant" screen first. This is normal. It's downloading the latest parts of the system. It can take a few minutes. Don't close the tab - just wait.
Creating Your Account and Setting Your Location
Once the system is ready, you'll create your admin account. Enter your name, a username, and a strong password. This account controls everything in Home Assistant. Keep your login details safe.

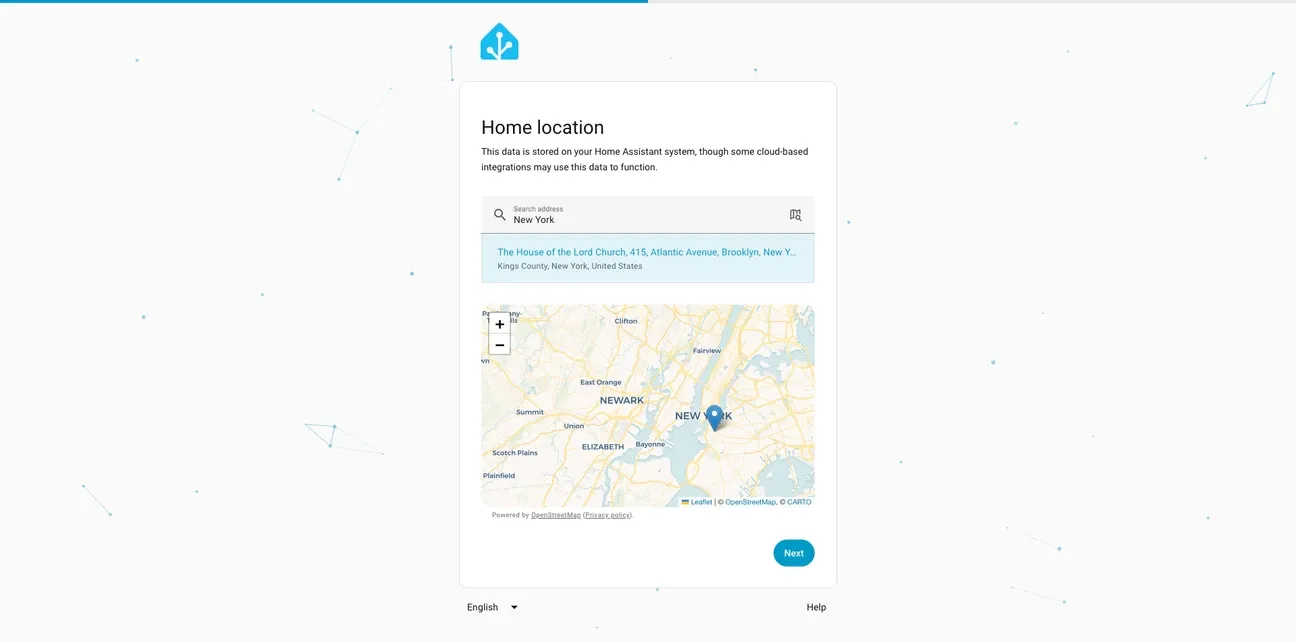
Next, you'll set your location. Enter your time zone and home address. This helps with weather info and sun-based auto tasks. It also makes features like sunrise and sunset control work right.
How Do You Discover and Add Your Devices?
One of the best parts of the first-time setup is watching Home Assistant find your devices on its own. It scans your network and lists what it finds. You might see smart bulbs, thermostats, plugs, and cameras show up right away.
- Auto-discovery makes adding devices fast and easy.
- If a device doesn't appear, you can add it manually through the integrations menu.
Once your devices are in, you can start building auto tasks and scenes.
How Do You Use the Home Assistant Dashboard?
After setup, it's time to get familiar with the interface. The main dashboard shows all your devices and active auto tasks at a glance.
The sidebar has these main sections:
- Overview: Your home's status and device controls in one place.
- Configuration: Where you add devices and change system settings.
- Automations: Build rules to handle daily tasks on their own.
- History and Logs: Great for checking what happened and fixing issues.
You'll get used to the layout quickly. Spend a few minutes clicking around after your first boot.
How Do You Update Home Assistant Step by Step?
Keeping your system current is important. Updates fix bugs, add features, and patch security holes. Here's the safest way to update.
Update from the Web Interface
-
Check what's changing: Go to Settings > System > Updates. Open the update card for Home Assistant Core. Read the release notes. Look for any breaking changes that might affect your setup.
-
Back up first: Go to Settings > System > Backups. Click Create backup. Name it something like
pre-update-2025-09-07. Include add-ons, media, and your settings. -
Update add-ons: Go to Settings > Add-ons. Update any add-ons that have new versions. Do this before updating the core.
-
Update in order: Go back to Settings > System > Updates. If there are multiple updates, apply them in this order:
- Home Assistant OS (if shown)
- Supervisor
- Home Assistant Core
- Add-ons last
-
Wait for restart: The page may go blank for a minute. That's normal. Don't unplug the device. Wait for the interface to come back.
-
Check the version: Go to Settings > About. Confirm the new version number is there.
-
Do a quick check: Go to Settings > System > Logs. Look for any new errors. Test a few auto tasks. Make sure your dashboards load.
-
Roll back if needed: If something breaks, go to Settings > System > Backups. Click Restore on your pre-update backup. Everything goes back to how it was.
Update from the Terminal
If you prefer the terminal (using the SSH add-on):
-
Update Core:
ha core update -
Update Supervisor:
ha supervisor update -
Update the OS:
ha os update -
Update all add-ons:
ha addons update --all
For Docker users: pull the latest image and rebuild your container. Always back up your
config/folder first.
After the Update
- Re-enable any integrations you turned off.
- Clear your browser cache if the dashboard looks odd.
- Go to Settings > System > Restart if some devices didn't come back.
What Tips Help Ensure a Smooth First Setup?
Here are a few things that help a lot:
- Don't use a regular SD card long-term. It wears out fast under constant use. Use an SSD or a high-quality A2 SD card.
- Keep your Home Assistant device on the same network segment as your smart devices. This makes discovery work better.
- Update the system often. New versions bring both security fixes and new features.
- Start with simple auto tasks. Get comfortable before you try complex ones.
- Use the community forums and official docs when you get stuck. There's a huge user base out there.
These habits will save you time and frustration as your smart home grows.
How Do You Expand and Customize Your Setup?
Home Assistant works with a huge range of smart devices. You're not limited to big brands. It handles lights, sensors, locks, cameras, and much more. For lighting, the Philips Hue integration is one of the most popular starting points.
As you get comfortable, you can explore:
- Voice controls using Alexa or Google Assistant.
- Auto scripts that run multi-step routines on their own.
- Energy tracking with smart plugs like the Tapo Smart Plug P125M and Tapo Mini Smart Plug P100.
- Security tools including cameras like the eufy Indoor Cam E220 and eufyCam 2C Pro, plus smart locks.
Your setup grows with you. What you do today is just the start.
By following this clear, step-by-step guide, even beginners can run their smart home with confidence. Home Assistant's auto discovery, clean interface, and wide device support make it a top choice for smart living.
Want the deep technical details? Check Alexa smart home device documentation. Whether you want convenience, lower energy bills, or full home control, Home Assistant is your gateway to a smarter home. The official Home Assistant getting started documentation covers all installation methods and first-time configuration steps in detail.
What Are the Home Assistant Architecture and Installation Options?
Home Assistant works on many different devices. This gives you choices. A dedicated system like the Raspberry Pi 4 or Intel NUC gives you the full feature set. It supports add-ons without limits. Docker installs work too. They're good if you want to run Home Assistant with other programs on one server.
The Pi 4 with 4GB RAM works for most homes. It handles dozens of devices and automations easily. For bigger setups with over 100 devices, use an Intel NUC or mini PC. They have more power. Solid-state storage is more reliable than SD cards. Use it for logging and backups.
How Do You Integrate Devices and Services with Home Assistant?
Home Assistant works with over 3,000 different devices and services. This includes smart home devices, weather, and media players. It finds many devices on its own. They show up under Configuration > Integrations. Click to add them.
Local connections are best. They talk to your devices without the internet. This keeps things fast. If your internet goes down, your home still works. Zigbee2MQTT connects hundreds of Zigbee devices from different brands. Z-Wave JS works the same way for Z-Wave devices.
How Do You Create Automations with the Visual Editor?
Home Assistant has a visual editor for automations. You don't need to code. The editor works with triggers, conditions, and actions. Triggers start the automation. They can be time, device changes, sunrise, or webhooks.
Conditions control when automations run. A nighttime light automation can check if vacation mode is on. If it is, the lights don't run. You can combine multiple conditions. No YAML needed.
How Do You Set Up Energy Monitoring and the Dashboard?
The Energy dashboard shows how much power your home uses. It compares usage over time. Plug smart plugs into the dashboard. They show which appliances use the most power. Often, old fridges and air conditioners are the biggest energy users.
You can build custom dashboards. Add controls and sensors to your home screen. Toggle buttons turn things on and off. Sensor graphs show live data. The tile layout looks clean. Groups keep related controls together.
How Do You Create Advanced Automations with Scripts and Templates?
Scripts are more powerful than automations. They handle multi-step tasks. For example, a "movie mode" script dims the lights, closes the blinds, turns on the TV, and starts your app. It does this in order with pauses between steps.
Templates use sensors to make smart decisions. For example, set the thermostat based on the time of day and if anyone's home. Or control lights based on motion sensor data. The template editor helps you test code before using it.
What Is the First Setup Quick Guide for Home Assistant?
Download the installer. Pick your device. Flash the image. Plug it in. Power it on.
Wait five minutes. Open a browser. Type homeassistant.local:8123. The welcome screen appears. Click Start.
Enter your name. Choose a username. Set a password. Write it down. You need it to log in later.
Select your location. This sets sunrise and sunset times. Your timezone too. These affect automations. Get them right from the start.
Add smart home devices now or skip. You can add them later. Both options work. Adding now speeds up setup. Skipping now is fine too.
The main dashboard appears. Explore the settings. Add integrations. Set up automations. Build your dashboard. Take your time.
Stuck? Check the official docs. Search the community forum. Thousands of people solved the same problems. Help is easy to find.
What Should You Know Before You Start?
Get your SD card. Get your Pi. Get a power plug. Get an Ethernet cable. Have them all ready.
Flash the image first. Use the Pi Imager tool. It is free to download. Pick the Home Assistant OS image. Flash it. Put the card in the Pi.
What Happens During First Boot?
Plug in the Pi. Wait five minutes. Open a browser. Type homeassistant.local:8123. You should see a page.
If no page: wait two more minutes. Then try again. First boot takes time. The Pi is setting up. Be patient.
How Do You Create Your Home Assistant Account?
A wizard starts. Click through it. Enter your name. Pick a username. Set a password. Write it down.
This is your admin account. Keep the password safe. You need it to log in. If you lose it, you have to reset.
How Do You Add Your First Device?
Go to Settings. Click Integrations. See if any show up. Home Assistant finds some on its own. Click Configure on the ones you want.
No devices found? That is fine. You can add them by hand. Click Add Integration. Search by brand. Follow the steps.
Is this free? Yes. Home Assistant is free. Does it need a subscription? No. No monthly fees. What hardware do I need? A Raspberry Pi. An SD card. A power cable. That is it. How long does setup take? About one hour for most people. Can I add devices later? Yes. Add them any time. What if I get stuck? Check the docs. Search the forum. Ask for help. Do I need to know code? No. The visual tools work for most things. Can I reset it? Yes. Flash a new image. Start over. Is my data private? Yes. Everything runs on your home network. Nothing leaves your house.
Frequently Asked Questions
What is the minimum hardware needed to install Home Assistant for the first time?
A Raspberry Pi 4 with 4GB RAM and a 32GB or larger microSD card is the most reliable budget entry point, costing around $55-65 for the board plus $8-12 for a quality card. I'd strongly recommend a branded card, Samsung PRO Endurance or SanDisk MAX Endurance, because cheap microSDs fail within a year on write-heavy HA workloads. Home Assistant OS also installs on most x86 mini PCs with at least 4GB RAM and 32GB storage. The Home Assistant Green ($99) is the most hassle-free option if you want something that just works out of the box: it arrives with HA pre-installed, boots in under 2 minutes, and has passive cooling so there's no fan noise. For a truly minimal spend, any x86 machine running at least 4 cores handles HA without issues. Don't try running HA inside Docker on a shared server, it limits the hardware integrations and USB device access you'll need for Zigbee.
How long does a first-time Home Assistant setup take from start to working dashboard?
Allow 30-60 minutes for the core process: flashing the image takes 3-5 minutes with Balena Etcher, first boot and HA OS initialization takes another 5-10 minutes, and the onboarding wizard adds 5 minutes. By that point you'll see the dashboard. Discovering and integrating devices is where time varies. If you have a Zigbee USB dongle, the integration setup takes 10-15 minutes but pairing individual devices adds 2-5 minutes per device. For a 20-device home, the first full setup realistically takes 2-4 hours spread over a couple of evenings. What I didn't expect the first time: HA auto-discovers nearby devices on the network and adds them without asking, so you'll spend some time cleaning up entities you don't need. That discovery phase is actually helpful, I found a device I'd forgotten about, but it adds 20-30 minutes of organization time.
Do I need to know programming to use Home Assistant as a beginner?
No programming is required for basic use, and I'd say most people get 80% of the value from Home Assistant without ever opening a YAML file. The web UI handles device setup, automations using the drag-and-drop Automation editor, and dashboards through a drag-and-drop card system. You can create time-based automations, trigger automations from device states, and build multi-condition routines entirely through the visual editor, no code involved. YAML becomes useful once you want automations the visual editor can't express: complex templates, mathematical operations on sensor values, or integrations that lack UI setup flows. Blueprint sharing is another shortcut: the HA community publishes ready-made automations you can import in one click and customize through a form, skipping YAML entirely. I went 6 months without writing any YAML before I wanted features that needed it.