Connect TONGOU Smart Switch to Home Assistant Guide 2026
This post may contain affiliate links. As an Amazon Associate we earn from qualifying purchases. Disclosure.
Learn how to integrate TONGOU smart circuit breakers with metering capabilities into your Home Assistant setup for comprehensive electrical management and energy monitoring.
Home Assistant has become the central hub for smart home enthusiasts seeking complete control and automation of their connected devices. Integrating TONGOU smart switches with metering capabilities into Home Assistant opens up powerful possibilities for energy monitoring and intelligent circuit management. This guide walks you through the entire integration process.
Bottom line: TONGOU smart circuit breakers connect to Home Assistant through ZHA (ZigBee Home Automation), giving you local control of individual circuits plus real-time power, voltage, and energy monitoring. Pair the device via the ZigBee hub, rename entities, and use the built-in Energy Dashboard to track consumption and build power-based automations.
Why Should You Connect TONGOU to Home Assistant?
TONGOU smart circuit breakers bring hardware-level electrical control combined with real-time energy metering to your smart home. Connecting them to Home Assistant allows you to:
Curious about the underlying standard? It is documented at Thread Border Router documentation.
- Monitor real-time power consumption across individual circuits
- Create automations based on energy usage patterns
- Integrate circuit control with other smart home devices
- Build dashboards displaying electrical system health
- Receive alerts when circuits draw excessive power
What Prerequisites Do You Need for TONGOU Integration?
Before connecting your TONGOU smart switch, ensure you have:
- Home Assistant installation (latest version recommended)
- ZigBee hub or adapter compatible with Home Assistant (Sonoff Zigbee 3.0 USB Dongle, ConBee II, etc.)
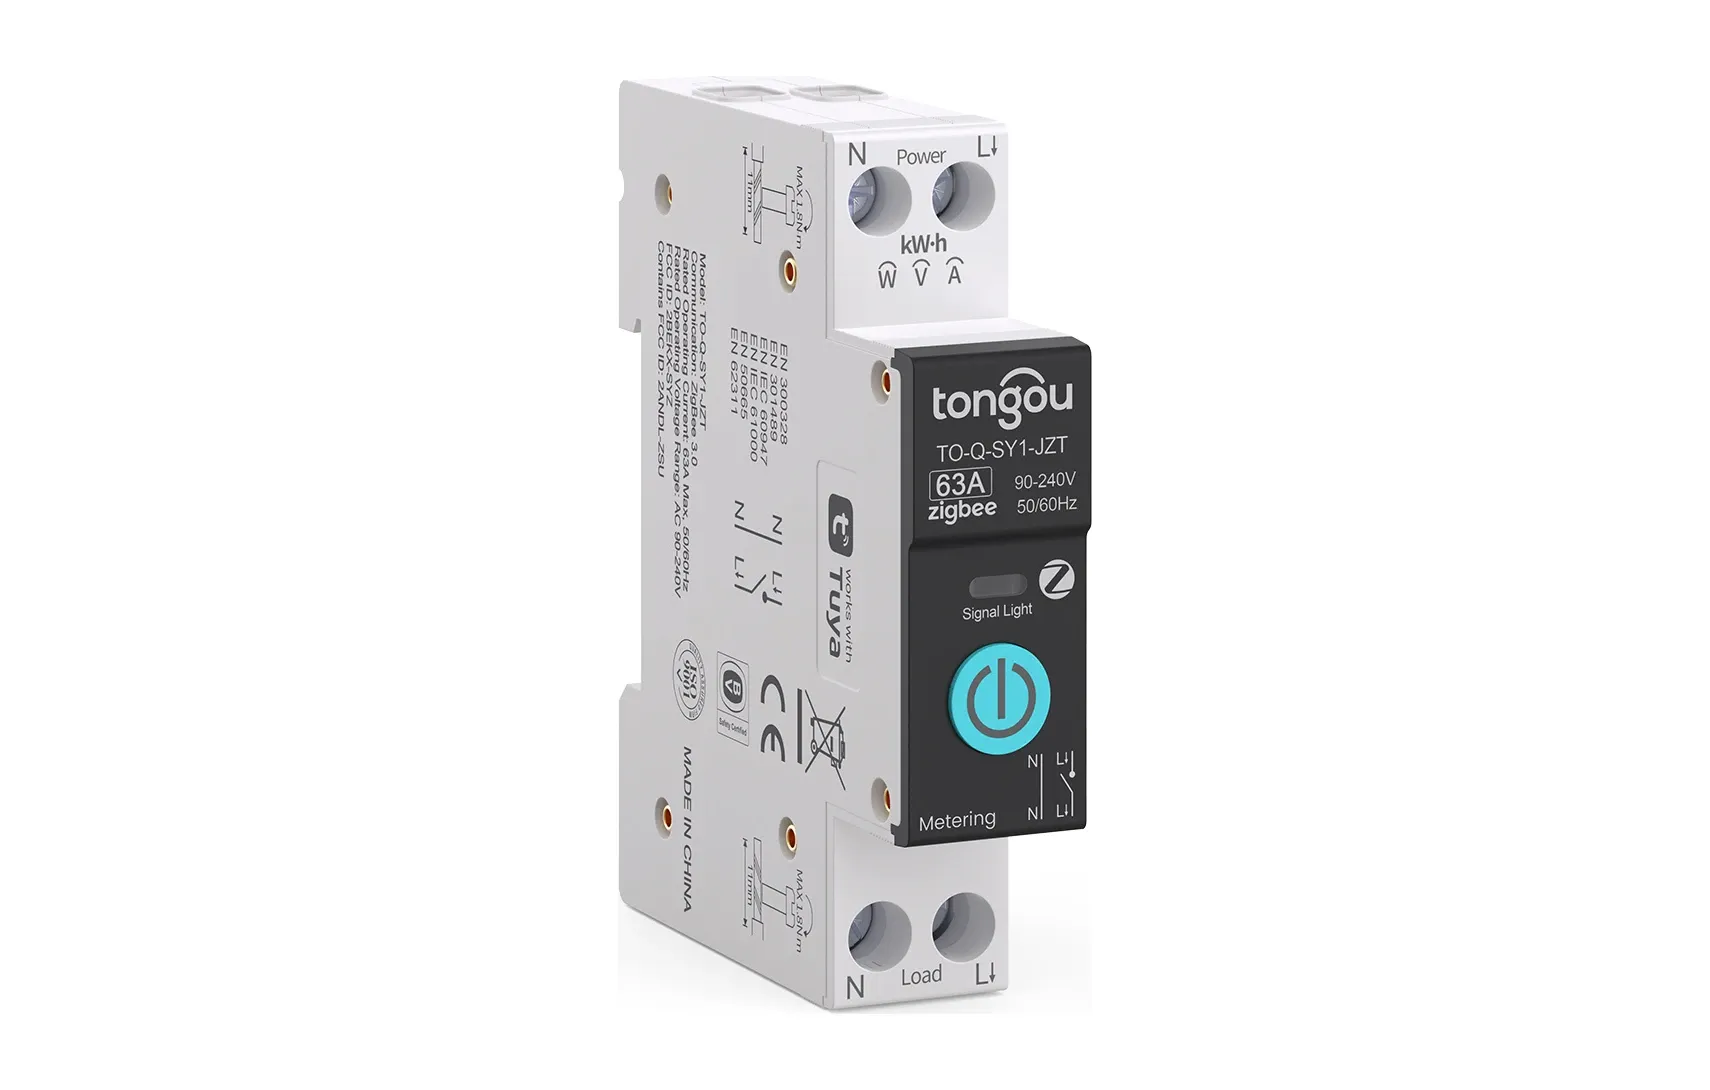
- TONGOU TO-Q-SY1-JZT or compatible model
- Network access to your Home Assistant instance
- Basic understanding of Home Assistant configuration
For those seeking alternative energy monitoring solutions, SwitchBot Plug Mini (EU) offers smart power monitoring for individual outlets with Thread and Matter support, providing flexibility when circuit-level monitoring isn't available or practical. For broader home automation integration, the SwitchBot K20 Pro Multitasking Robot Vacuum can be automated through Home Assistant routines based on energy consumption data from your TONGOU switches.
How Does ZigBee Communication Work for TONGOU?
TONGOU smart switches use ZigBee 3.0 wireless protocol, a low-power mesh networking standard ideal for smart home devices. Home Assistant's ZHA (Zigbee Home Automation) integration handles ZigBee device communication automatically once devices are paired.
The ZigBee mesh network allows multiple TONGOU devices throughout your electrical installation to relay signals, extending range and ensuring reliable communication even in challenging environments.
How Do You Connect TONGOU to Home Assistant Step by Step?
1. Prepare Your ZigBee Hub
First, ensure your ZigBee hub is properly connected to Home Assistant:
- Install your ZigBee adapter to your Home Assistant server
- Restart Home Assistant to detect the adapter
- Go to Settings > Devices & Services
- Click Create Integration and search for "ZHA"
- Select your ZigBee adapter from the dropdown
- Click Submit to initialize the ZigBee hub
2. Enable Pairing Mode on TONGOU Switch
Your TONGOU smart switch needs to enter pairing mode to communicate with the Home Assistant ZigBee hub:
- Locate the pairing button on your TONGOU smart switch (typically on the device or accessible through Smart Life app)
- Press and hold the pairing button for 5-10 seconds until the LED begins flashing
- Return to Home Assistant ZHA interface - pairing mode is typically active for 2-3 minutes
3. Complete ZigBee Pairing
Once your TONGOU switch is in pairing mode:
- In Home Assistant ZHA interface, click Add Device
- The system scans for nearby ZigBee devices
- Select your TONGOU device when it appears
- Home Assistant automatically detects the device type and capabilities
- Allow the pairing process to complete (usually 30-60 seconds)
4. Configure Energy Metering
After successful pairing, Home Assistant recognizes the TONGOU smart switch with its energy metering capabilities:
- Go to Settings > Devices & Services > Devices
- Find your TONGOU device in the list
- Click to view device details and entities
- Verify that power consumption, voltage, and energy entities are available
- Rename entities for clarity (e.g., "Kitchen Circuit Power" instead of generic names)
How Do You Create Energy Monitoring Automations with TONGOU?
With TONGOU smart switches connected, you can build powerful automations:
Alert on Excessive Power Draw
Create an automation notifying you when a specific circuit exceeds power thresholds:
automation:
  - alias: "Alert High Kitchen Circuit Power"
    trigger:
      platform: numeric_state
      entity_id: sensor.kitchen_circuit_power
      above: 3000
    action:
      service: notify.mobile_app
      data:
        message: "Kitchen circuit drawing excessive power: {{ states('sensor.kitchen_circuit_power') }}W"
Daily Energy Report
Summarize daily energy consumption across TONGOU circuits:
automation:
  - alias: "Daily Energy Report"
    trigger:
      platform: time
      at: "22:00:00"
    action:
      service: notify.mobile_app
      data:
        message: "Today's consumption - Kitchen: {{ states('sensor.kitchen_circuit_energy') }}kWh"
Smart Circuit Control Based on Time
Automatically manage circuits based on schedules:
automation:
  - alias: "Evening Lighting Schedule"
    trigger:
      platform: time
      at: "18:00:00"
    action:
      service: switch.turn_on
      target:
        entity_id: switch.living_room_circuit
Building an Energy Dashboard
Home Assistant's dashboard feature lets you visualize TONGOU energy data:
- Create a new dashboard in Home Assistant
- Add Energy gauge cards for each TONGOU circuit
- Include power consumption history graphs
- Display voltage and current measurements
- Add automations status and circuit control buttons
This centralized view provides complete electrical system visibility.
How Do You Troubleshoot TONGOU Connection Issues?
Device Not Pairing
If your TONGOU smart switch doesn't appear during pairing:
- Verify pairing button was pressed correctly and LED is flashing
- Check ZigBee hub is powered and properly initialized
- Ensure TONGOU device is within range (typically 10+ meters depending on obstacles)
- Restart both devices and try again
Poor Signal Quality
For unreliable ZigBee communication:
- Add additional ZigBee repeaters closer to the device
- Move ZigBee hub away from WiFi routers and interference sources
- Update TONGOU device firmware through Smart Life app if available
Metering Data Not Updating
If energy values aren't updating:
- Verify device paired successfully and appears in Home Assistant
- Check entity availability in device details
- Force update Home Assistant ZHA integration
- Unpair and re-pair the device
What Advanced Integration Features Does TONGOU Support?
Home Assistant enables sophisticated TONGOU integrations:
Energy Dashboard Integration
Enable Home Assistant's built-in Energy Dashboard to track your home's power consumption using TONGOU metering data across multiple circuits.
Automation with Other Devices
Combine TONGOU circuit control with other smart devices:
- Turn off entertainment circuits when bedtime automation triggers
- Reduce heating loads during peak pricing hours
- Coordinate multiple circuits for balanced power distribution
Historical Analysis
Review past energy consumption patterns to identify optimization opportunities and validate conservation efforts.
Tongou switches pair well with other Home Assistant devices like Aeotec hubs and Bosch motion sensors for comprehensive automation.
Connecting TONGOU smart switches with metering to Home Assistant creates a powerful platform for comprehensive electrical management. The combination of hardware-level circuit control and Home Assistant's automation capabilities enables intelligent energy optimization, security monitoring, and complete smart home integration. With proper setup and automation strategies, your TONGOU devices become central to achieving true smart home electrical efficiency.
When something breaks, Home Assistant documentation is where I start. Home Assistant Architecture and Installation Options
Home Assistant runs on many hardware platforms. This makes it easy to find an option that fits your skill level.
Home Assistant OS on a Raspberry Pi 4 or Intel NUC gives you the full feature set with add-on support. Docker installations work for users who already run a home server.
The Raspberry Pi 4 with 4GB RAM handles most setups with dozens of devices. For 100+ devices, an Intel NUC gives more headroom. Use solid-state storage instead of an SD card. It is faster and far more reliable for the database writes Home Assistant performs constantly.
Integrating Devices and Services
Home Assistant has over 3,000 official integrations. These cover smart devices, weather services, media players, and cloud platforms.
The built-in discovery system finds many devices on your local network automatically. They appear as one-click setup options under Configuration > Integrations.
Local integrations talk directly to devices without using the cloud. This means faster response times and no downtime during internet outages. Zigbee2MQTT paired with a USB coordinator connects hundreds of Zigbee devices through one integration. Z-Wave JS handles Z-Wave devices the same way, with over 2,000 supported device profiles.
Creating Automations with the Visual Editor
Home Assistant's automation editor uses a trigger-condition-action structure. You do not need to write code for most automations.
Triggers start the automation. They can be time schedules, device state changes, sunrise/sunset events, or webhook calls.
Conditions stop the automation from running when it should not. For example, a nighttime lighting routine can check whether "vacation mode" is on. If it is, the lights stay off even on schedule. You can stack conditions with AND/OR logic for more complex rules.
Energy Monitoring and Dashboard Setup
The Energy dashboard tracks electricity use across your devices over time. Adding smart plugs with power monitoring reveals which appliances use the most energy. Many users find that refrigerators, pool pumps, and HVAC systems account for 60-70% of total home energy use.
Custom Lovelace dashboards put your most-used controls on one screen. Toggle buttons, sensor graphs, and tile cards let you build a layout that fits your needs.
Advanced Automations with Scripts and Templates
Scripts run a sequence of actions with delays and conditions. They work well for multi-step routines. A "movie mode" script can dim lights to 20%, close motorized blinds, turn on the TV, and start the streaming app - each step with a short delay between.
Jinja2 templates let automations use live sensor data. You can set a thermostat temperature based on the time of day and whether anyone is home. The developer tools template editor lets you test template syntax before adding it to an automation.
Frequently Asked Questions
How do I connect a TONGOU smart switch to Home Assistant?
TONGOU smart switches integrate with Home Assistant through the Tuya integration since they use the Tuya IoT platform. First pair the switch in the Tuya or Smart Life app. Then add the Tuya integration in Home Assistant using your Tuya IoT developer credentials. The switch appears as a controllable entity with on/off control and energy metering data.
Can TONGOU switches monitor energy consumption in Home Assistant?
Yes, TONGOU smart circuit breakers with metering capability report real-time power consumption, voltage, and current through the Tuya integration. Home Assistant displays this data in the Energy dashboard, tracks historical consumption, and enables automations triggered by power thresholds such as alerts when an appliance completes its cycle.
Are TONGOU DIN rail switches safe for panel installation?
TONGOU smart circuit breakers are designed for DIN rail mounting in electrical panels. They are CE certified and meet electrical safety standards. However, installation in an electrical panel should be performed by a qualified electrician due to the high-voltage environment. The switches replace standard circuit breakers in the same DIN rail space.
Do TONGOU switches work without internet?
TONGOU switches require internet for initial setup through the Tuya app and for cloud-based control. For local control without internet, you can flash the device with custom firmware like Tasmota using tuya-convert, enabling direct communication with Home Assistant via MQTT. Note that flashing voids the warranty and requires technical knowledge.
What is the advantage of TONGOU over regular smart plugs?
TONGOU DIN rail circuit breakers monitor entire circuits at the panel level rather than individual outlets. This provides whole-circuit energy monitoring, overcurrent protection, and the ability to control hardwired appliances like water heaters, HVAC systems, and EV chargers that cannot plug into standard smart plugs. They also do not occupy outlet space.