
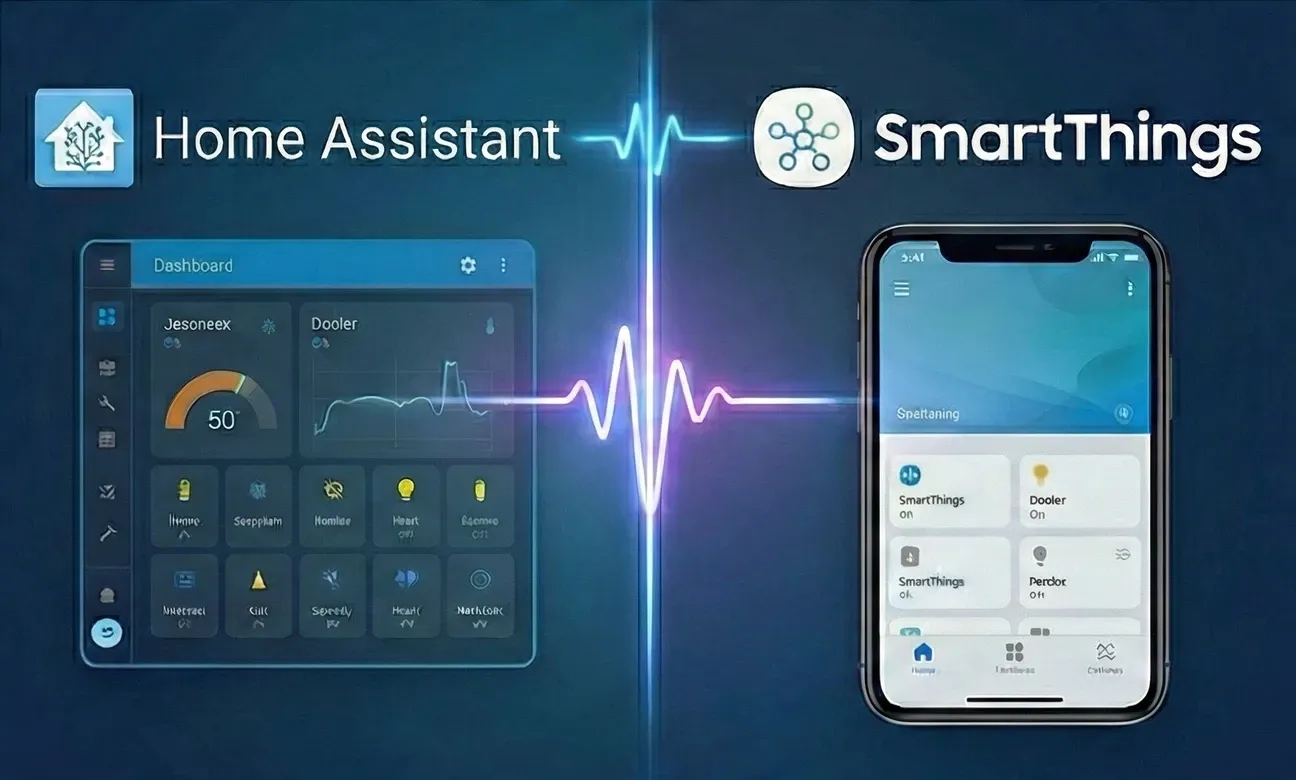
These are two popular smart home platforms. Each excels in a different way. Integrating them lets you combine powerful local automations with cloud convenience and wide device support. This guide explains why linking the two platforms makes your smart home stronger. It also shows you exactly how to do it. All steps are fully explained below. You can also improve your home by combining both systems with smart lighting installation for even more flexible control.
For those seeking detailed instructions, the official integration documentation provides comprehensive guidance on setup and usage. Additionally, the connection ensures seamless communication between Samsung's ecosystem and the local platform, enabling more robust smart home control.
Why Pair These Platforms?
One platform has a slick mobile app and works with many devices. But its rules engine can feel limited. The other is open‑source and highly customizable. However, new users might miss the polish and remote access the first offers. When you connect them, you get:
- One dashboard for every light, lock, camera, and sensor
- Fast local routines that work even if the internet is down
- Cloud access for anyone in your family, anywhere in the world
- Much wider device support than either platform alone
What Is Home Assistant?
Home Assistant is a self‑hosted smart home server. It runs on almost anything: a Raspberry Pi, NAS, or virtual machine. It keeps all your data local. You can build detailed automations without coding.
Stand‑Out Home Assistant Features
- Local processing for privacy and speed
- Over 2,500 integrations maintained by a lively community
- Flexible dashboards with drag‑and‑drop Lovelace cards
- YAML or visual editors for detailed conditions, delays, and scenes
What Is SmartThings?

SmartThings, owned by Samsung, connects appliances, TVs, Zigbee hubs, and hundreds of third‑party devices under one app.
Key SmartThings Advantages
- Polished mobile app with remote access out of the box
- Certified Works with SmartThings device program
- Easy setup for Samsung products and Matter devices
- Simple automation builder perfect for beginners
Top Benefits of Integration
-optimized.webp)
Single Control Center
Bringing cloud devices into the local platform means your light switches, TV, and washing machine show up alongside Zigbee sensors and ESPHome gadgets. You can create one scene to dim the living‑room lights, lock the front door, and mute the TV for movie night-no app switching needed.
Advanced Automations
The Automation Editor and Blueprint system can use cloud events like "washing cycle completed" or "TV turned on." You can trigger voice announcements, notifications, or even start your robot vacuum automatically.
Reliable Local Execution
If your connection to the cloud drops, the local server keeps basic tasks running. Critical routines such as turning on hallway lights when motion is detected still happen instantly. This benefit is a core reason many users seek cloud-free solutions, enabling local control for improved reliability.
Broader Hardware Support
Some Zigbee products pair only with the cloud hub. Some MQTT devices live only on the local server. Linking the two fills those gaps. Your routines can mix and match brands freely.
Devices That Shine with the Integration
- Samsung appliances (washing machines, fridges)
- Philips Hue bulbs via SmartThings hub
- Z‑Wave locks like Schlage BE469
- Zigbee devices like Aqara Smart Plug and Aqara LED Strip T1 for reliable local control
- Sonoff Zigbee 3.0 Pro hub for extended Zigbee network reach
- GLEDOPTO dimmable lights for color control and automation
- Tuya smart switches and sensors for cross-platform compatibility
- ESPHome DIY sensors on Home Assistant
- Matter‑enabled thermostats
How to Connect Both Platforms Step-by-Step
Prepare Home Assistant Install the latest version and make sure you can access the UI remotely.
Verify Device Setup Add all your devices to the cloud platform app and check they respond.
Install the Integration In Home Assistant, go to Settings ▸ Devices & Services ▸ Add Integration and search for "SmartThings." Follow the wizard to log in with your Samsung account.
Allow Locations Choose the "location" that has your hub and devices. Allow the permissions so the local platform can read status and send commands.
Sync Entities After allowing access, the local system imports your devices. Rename entities to clear names like
washer_cycleorbedroom_tvfor easy automation.Build Your First Automation Use the visual editor to make a rule: When the washer finishes, flash the light strip blue and send a push notification.
These steps provide a comprehensive setup guide for a smooth integration process.
Configuring Imported Devices Step by Step
After completing the initial SmartThings integration, Home Assistant displays a dialog where you configure each imported device. This critical step ensures your devices have meaningful names and proper room assignments for effective automation.
Step 1: Name Your Devices
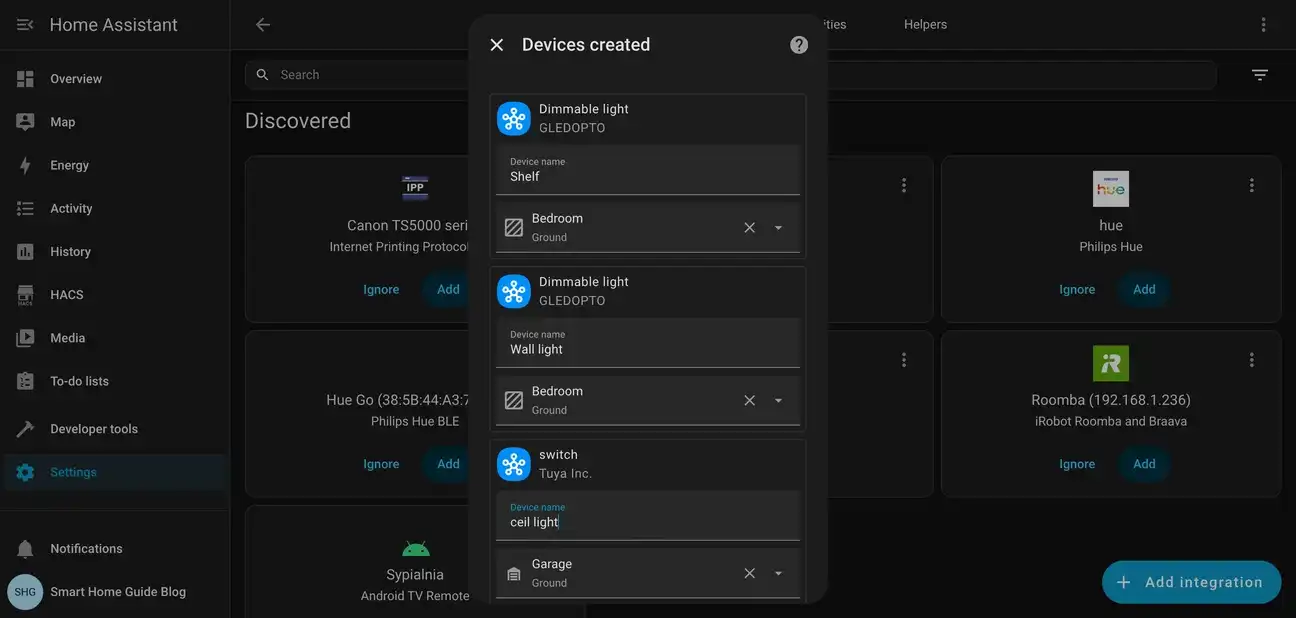
When the integration completes, Home Assistant presents all discovered devices in a configuration panel. For each device, you can set:
- Device name: Replace generic names like "Dimmable light" with descriptive labels such as "Shelf" or "Wall light" that identify the device's location or purpose
- Area assignment: Use the dropdown to assign devices to rooms like Bedroom, Kitchen, or Garage
In this example, GLEDOPTO dimmable lights are being configured for the Bedroom area, while a Tuya switch controlling the ceiling light is assigned to the Garage. Clear naming conventions make automations easier to create and debug later.
Step 2: Configure All Device Types
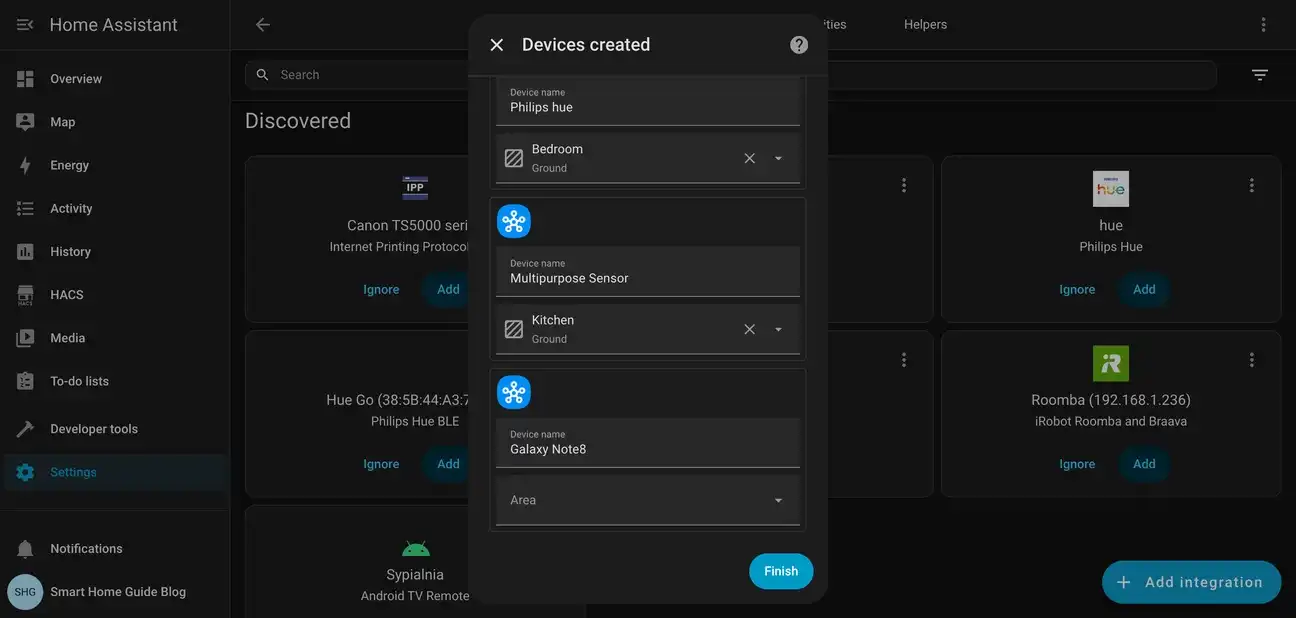
Continue through the device list, configuring each type appropriately:
- Smart bulbs: Name Philips Hue and other lighting devices by their physical location
- Sensors: Assign Multipurpose Sensors to the rooms they monitor (Kitchen, Living room, etc.)
- Mobile devices: Samsung phones like Galaxy Note8 appear as presence sensors for home/away automations
Once all devices are configured, click the Finish button to complete the import. Home Assistant creates entities for each device based on your naming conventions.
Step 3: Review Your Integration
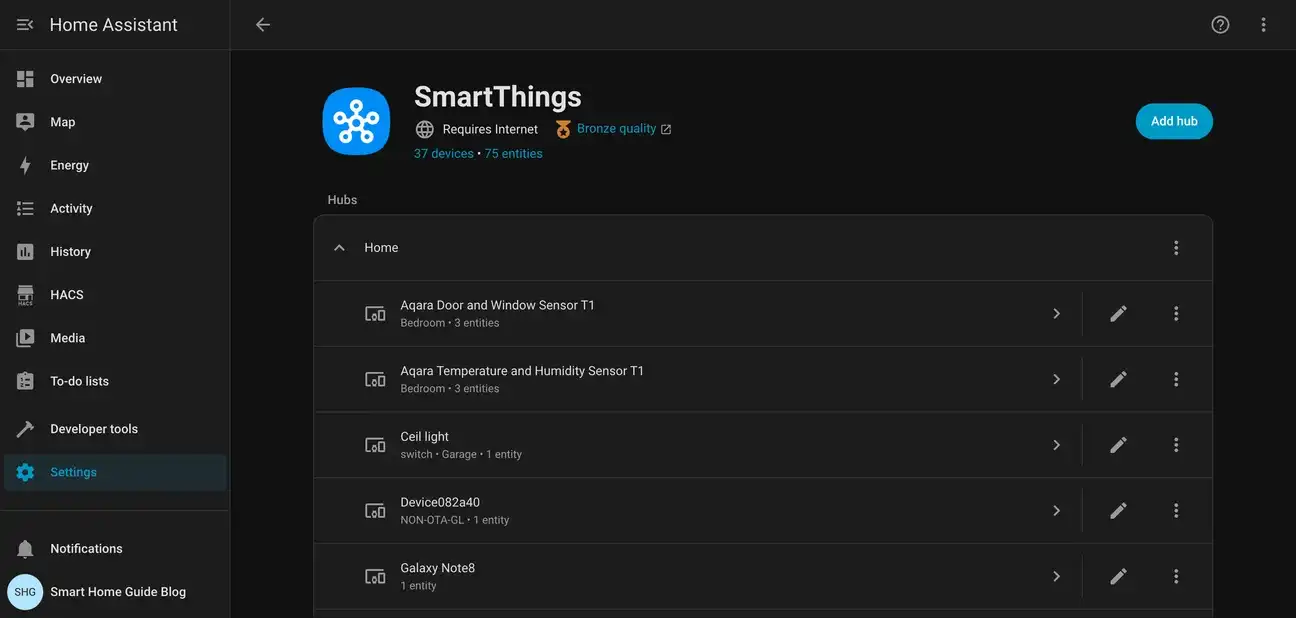
After finishing device configuration, navigate to Settings > Devices & Services > SmartThings to review your integration. The overview displays:
- Total devices imported: Shows how many SmartThings devices are now available (37 devices in this example)
- Entity count: Indicates the number of controllable entities created (75 entities)
- Hub organization: Devices are grouped under their SmartThings hub location
- Device details: Each device shows its type, assigned area, and entity count
From this screen, you can click any device to access advanced settings, rename entities, or configure device-specific options. The integration quality indicator (Bronze, Silver, Gold) shows how well the integration handles your specific devices.
Troubleshooting Tips
- If devices don't appear, click Configure on the integration and choose Re-sync.
- Keep the mobile app updated; old versions may block token creation.
- To enable local execution, turn on Edge drivers on supported hubs. These allow local automation without relying on the cloud, improving speed and reliability.
- Ensure your hub firmware and integration settings are current to resolve most connectivity issues.
Common Questions About This Integration
Do These Platforms Work Together?
Yes. Home Assistant connects with the cloud platform through a built-in integration. This lets the two systems share device states and events. It brings cloud-connected devices into the local setup. This gives you better automation and more control. The integration makes it easy to manage your smart home devices in one place.
Getting Started with Both Platforms
Connecting both systems is straightforward if you follow the official guide. You grant access with your Samsung account and sync the location. This integration provides flexible control and supports more devices from both ecosystems. Make sure your devices work well together and keep both platforms updated for smooth communication.
Real-World Integration Examples
Many smart home users connect Zigbee, Z-Wave, and Wi-Fi devices across both platforms. For example, a Zigbee motion sensor (managed through the cloud platform) can trigger a Wi-Fi light (controlled locally). This creates seamless automation. The integration improves device compatibility and boosts reliability. It combines the local automation of the self-hosted system with the cloud features of the mobile-first platform. For example, even if the internet goes down, your lights and sensors can still respond instantly, while remote access remains available.
Comparing Both Systems
Both platforms have distinct strengths. The cloud-based option offers a polished mobile experience and easy remote access, ideal for beginners. The self-hosted option excels in customization, local control, and privacy. Your choice depends on your preference for cloud convenience versus local processing power. Connecting both combines the best of each approach.
Advanced Automation Examples
Once you've successfully integrated SmartThings with Home Assistant, you can create sophisticated automations that leverage capabilities of both platforms:
Whole-Home Movie Mode: When you activate "Movie Mode" through either system, it simultaneously dims Philips Hue lights (SmartThings), closes motorized blinds (Home Assistant), pauses robot vacuuming (SmartThings), and provides a notification confirming the scene activation (Home Assistant). This complex automation would be impossible with either platform alone.
Energy-Saving Routines: Monitor power consumption through SmartThings' integration with Samsung Smart Appliances, then use Home Assistant to trigger load-shifting automations. For example, when peak energy rates begin, automatically turn off non-essential devices and delay washing machine cycles until off-peak hours. This sophisticated cost optimization requires data from both platforms.
Occupancy-Based Climate Control: Combine SmartThings' mobile device presence detection with Home Assistant's local sensor data. When the last person leaves home (detected via SmartThings), Home Assistant activates eco-mode thermostat settings and adjusts smart vents. When the first person arrives home, SmartThings triggers a return-home routine that Home Assistant uses to set comfortable pre-arrival temperatures.
Smart Lighting Workflow: Motion sensors (SmartThings) trigger gradual light brightness increases (Home Assistant with zigbee lights) during evening hours, while daytime motion keeps lights at standard levels. When sunset occurs, SmartThings activates warm color temperatures on Philips Hue while Home Assistant simultaneously adjusts all other lighting. This seamless workflow requires bi-directional communication that the integration enables.
Laundry Notifications with Context: When the SmartThings washing machine reports cycle completion, Home Assistant checks current occupancy, room lighting, and time of day. It delivers notifications tailored to context-urgent audio alerts during work hours, gentle reminders in evenings, and automatic laundry room light activation for late-night cycles.
Comprehensive Device Compatibility Guide
Understanding which SmartThings devices work best with Home Assistant integration helps you choose compatible hardware and optimize your setup:
Perfectly Compatible Categories:
- Samsung appliances (washers, dryers, refrigerators, ovens) - Full support with all features accessible
- SmartThings hub devices - Seamless multi-location support
- Zigbee-certified devices paired through SmartThings - Complete functionality transfer
- Matter-certified devices - Full local and remote control
- Philips Hue lights via SmartThings bridge - All color and brightness features
- Z-Wave door locks and switches - Complete control with notifications
Partially Compatible Categories:
- Samsung SmartTV devices - Basic power and input control, some features unavailable
- Tuya devices paired to SmartThings - Core functionality works, some advanced features may not sync
- Custom SmartThings automations - Basic state changes visible, triggers not always transferable
Compatibility Considerations:
- Devices requiring SmartThings app-only features may lose functionality in Home Assistant automations
- Some manufacturer-specific integrations (like Samsung TVs) may offer better results through direct Home Assistant integration rather than through SmartThings
- Z-Wave devices local to Home Assistant may provide faster response than routing through SmartThings cloud
Performance Optimization and Local Execution
While the integration provides cloud access and remote control, optimizing for local performance improves reliability and response time:
Enable Edge Drivers on SmartThings Hub: Modern SmartThings hubs support Edge Drivers, allowing local execution of automations without cloud dependency. Enable Edge Drivers in the SmartThings hub settings to ensure critical automations run locally. This dramatically improves reliability during internet outages.
Designate Primary Control Points: For devices accessible through both platforms, choose one as primary. For example, designate Home Assistant as primary for Zigbee lights (faster local response), while using SmartThings as primary for Samsung appliances (better feature support). This prevents conflicting commands and optimization overhead.
Configure Update Frequencies: Home Assistant polls SmartThings for device state changes. Adjust polling intervals based on device criticality-frequent polling for motion sensors used in automations, less frequent for informational sensors. This reduces network traffic while maintaining responsiveness.
Use Direct Device Integration Where Available: For some device types, Home Assistant offers direct integration that's faster than SmartThings routing. For example, direct Zigbee devices in Home Assistant typically respond 200-500ms faster than routing through SmartThings. Consider this when expanding your setup.
Troubleshooting Advanced Issues
When you encounter persistent connectivity or synchronization issues, these advanced troubleshooting steps often resolve stubborn problems:
Clearing and Resetting the Integration:
- In Home Assistant: Settings > Devices & Services > SmartThings (gear icon) > Delete Integration
- Restart Home Assistant to ensure clean state
- Reinstall the SmartThings integration and re-authenticate
- This nuclear option resolves token corruption and sync issues that incremental fixes can't address
Checking Hub Connectivity:
- Access your SmartThings hub directly via web interface (hub.smartthings.com) to verify it's online
- Check for available firmware updates in SmartThings hub settings
- Verify all devices show as "Connected" in the SmartThings mobile app
- If devices show offline in SmartThings, they won't appear in Home Assistant
Examining Home Assistant Logs:
- Navigate to Settings > System > Logs to view integration-specific errors
- Search for "SmartThings" errors that indicate authentication, sync, or communication issues
- Common errors include "invalid_grant" (token expired), "device_list_sync_failed" (hub unreachable), or "unauthorized_client" (permission revocation)
Managing Integration Rate Limits:
- SmartThings cloud API has rate limits that aggressive polling can trigger
- If you see "rate limit exceeded" errors, increase polling intervals in the integration settings
- Disable polling for devices that don't require real-time updates
- Use automation triggers instead of state polling where possible
Best Practices for Managing Dual-Platform Smart Homes
Successfully operating both Home Assistant and SmartThings requires deliberate organizational practices:
Device Organization Strategy:
- Create a spreadsheet mapping each device to: physical location, SmartThings category, Home Assistant type, primary control platform, automation usage
- This documentation proves invaluable when troubleshooting and helps prevent conflicting automations
Naming Conventions:
- Use consistent naming across both platforms: "Living Room Overhead Light" not "Light_1" or "LR_Light"
- Include device type in the name for clarity: "Kitchen Motion Sensor" vs "Kitchen Multipurpose Sensor"
- Avoid special characters that may cause compatibility issues in automation triggers
Automation Location Decisions:
- SmartThings automations: Best for manufacturer-specific features (Samsung appliance cycles, TV control)
- Home Assistant automations: Better for complex logic, cross-platform coordination, local execution
- When automations perform the same action, choose the platform with best local support to minimize latency
Regular Maintenance Routines:
- Weekly: Check both platforms' app for offline devices or failed automations
- Monthly: Review automation logs for failed triggers and optimize inefficient rules
- Quarterly: Update firmware on all hubs and devices
- Annually: Document changes and purge obsolete automations or devices
Backup and Recovery Planning:
- Export Home Assistant automations regularly (Settings > System > System Information > Download Diagnostics)
- Take regular Home Assistant database backups to enable quick restoration if hardware fails
- Document SmartThings device configuration in case hub replacement becomes necessary
- Test recovery procedures annually to ensure you can actually restore from backups
Comparing Integration Approaches
Different smart home enthusiasts have varying priorities, and some may prefer alternative integration strategies:
Direct Zigbee Integration: Some users bypass SmartThings entirely, adding a Zigbee coordinator directly to Home Assistant (Sonoff Zigbee 3.0 dongle, Seeed XBee coordinator). This provides faster local response but sacrifices SmartThings' polished app and remote access. Best for technically advanced users prioritizing performance over convenience.
Separate Platform Operations: Others maintain SmartThings and Home Assistant as independent systems, using them for different device categories. This eliminates integration complexity but requires managing two separate interfaces and automations. Useful for avoiding vendor lock-in but adds operational complexity.
Hybrid Hub Approach: Using a SmartThings hub for cloud convenience and secondary Zigbee/Z-Wave coordinators in Home Assistant for local control of specific device types. This balances features and performance but requires careful device coordination to prevent conflicts.
Full Home Assistant Migration: Advanced users migrate all devices to Home Assistant with direct integrations, eliminating SmartThings entirely. This maximizes local control and customization but requires deep technical knowledge and sacrifices Samsung's app ecosystem. Best for Linux-savvy users comfortable with troubleshooting.
Future-Proofing Your Integration
The smart home ecosystem evolves rapidly, and decisions you make today impact compatibility for years:
Matter Protocol Adoption: As Matter adoption accelerates, devices increasingly support both Matter and legacy protocols. Prioritize Matter-certified devices for future flexibility-they'll work across multiple platforms even if direct integrations become obsolete.
Platform Migration Planning: Choose devices with multi-platform support to maintain flexibility. A Philips Hue bulb works in SmartThings, Home Assistant, Apple HomeKit, and Google Home. A proprietary Samsung device works only in SmartThings and Home Assistant.
Cloud Service Dependencies: Understand which automations depend on cloud services. If SmartThings cloud becomes unavailable, which automations fail? Design critical automations to execute locally in Home Assistant whenever possible.
Long-Term Hardware Planning: Consider hub replacement timelines. SmartThings hubs typically remain supported for 3-5 years. Plan device migrations as hub support approaches end-of-life to avoid forced hardware upgrades.
Real-World Migration Stories
Understanding how other users successfully integrated these platforms helps you plan your approach:
The Appliance-First Setup: Sarah had Samsung appliances and a SmartThings hub but wanted better automation. She installed Home Assistant on a Raspberry Pi, integrated SmartThings, then gradually added ESPHome DIY sensors and Zigbee devices directly to Home Assistant. Over 6 months, she built sophisticated automations leveraging both platforms' strengths. Her laundry notifications now respect family schedules, and energy management automations reduce her consumption 15%.
The Large Home Expansion: Mike's 4,000 sq ft home had SmartThings devices throughout. Adding Home Assistant let him create whole-home automations impossible before. Room-by-room motion sensing coordinated with zone-specific climate control eliminated temperature complaints from his large, multi-zone home. He now uses SmartThings primarily for Samsung appliances while Home Assistant orchestrates everything else.
The Privacy-Conscious Approach: James was concerned about cloud dependencies. By combining Home Assistant's local processing with SmartThings cloud only for remote access, he achieved his privacy goals while maintaining family convenience. Critical automations run locally; remote access remains available when needed.
Final Thoughts
Connecting both platforms combines local control with cloud convenience. With the steps above, you can enjoy fast, private automations and easy remote access. This partnership makes your smart home smarter and faster.
Beyond the setup, this integration's real value is its flexibility. Whether you want complex automations, better device response, or just one interface to control everything, the connection makes it possible. As smart home technology evolves, having a strong integration like this keeps your system flexible and ready for the future. For advanced users, this remains a powerful option to elevate your smart home automation.
The Home Assistant and SmartThings integration represents a significant step toward unified smart home control. By understanding both platforms' strengths and following best practices for device management and automation, you create a robust system that adapts to your evolving needs. Whether you're just beginning your smart home journey or optimizing an existing setup, this integration provides the flexibility and control modern homes demand.
If you're ready to bring the best of both platforms together, follow the steps in this guide and enjoy a smarter, faster, and more reliable smart home setup.